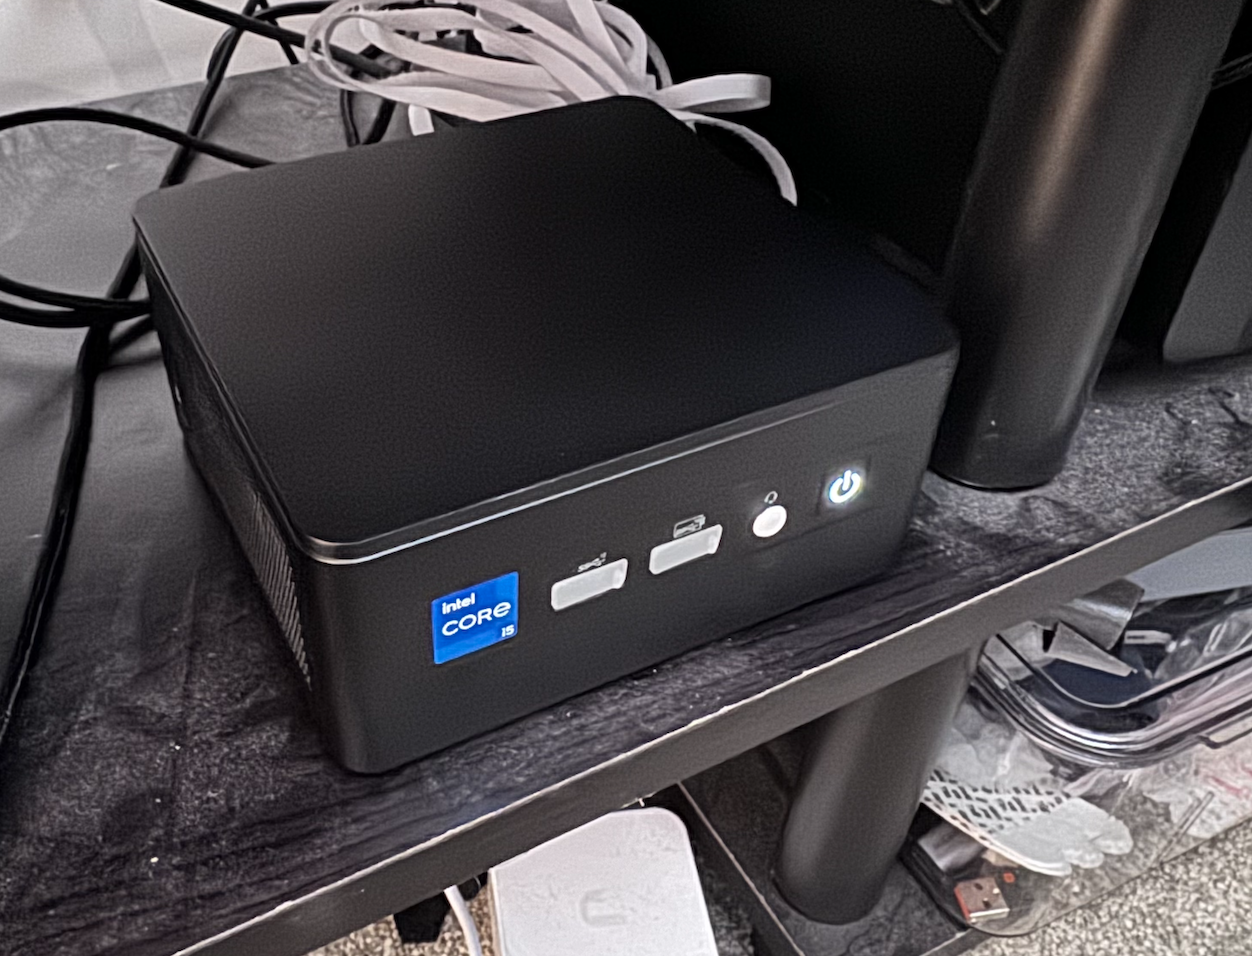
Upinel Notebook

Code, Homelab, and everything tech

I’m excited to share my recent project of building an ultra-compact, all-SSD HomeLab with the incredible Intel NUC12. Below, I will walk you through the specifications and the detailed process of creating this monster build.

NUC12 HomeLab Setup

Specifications

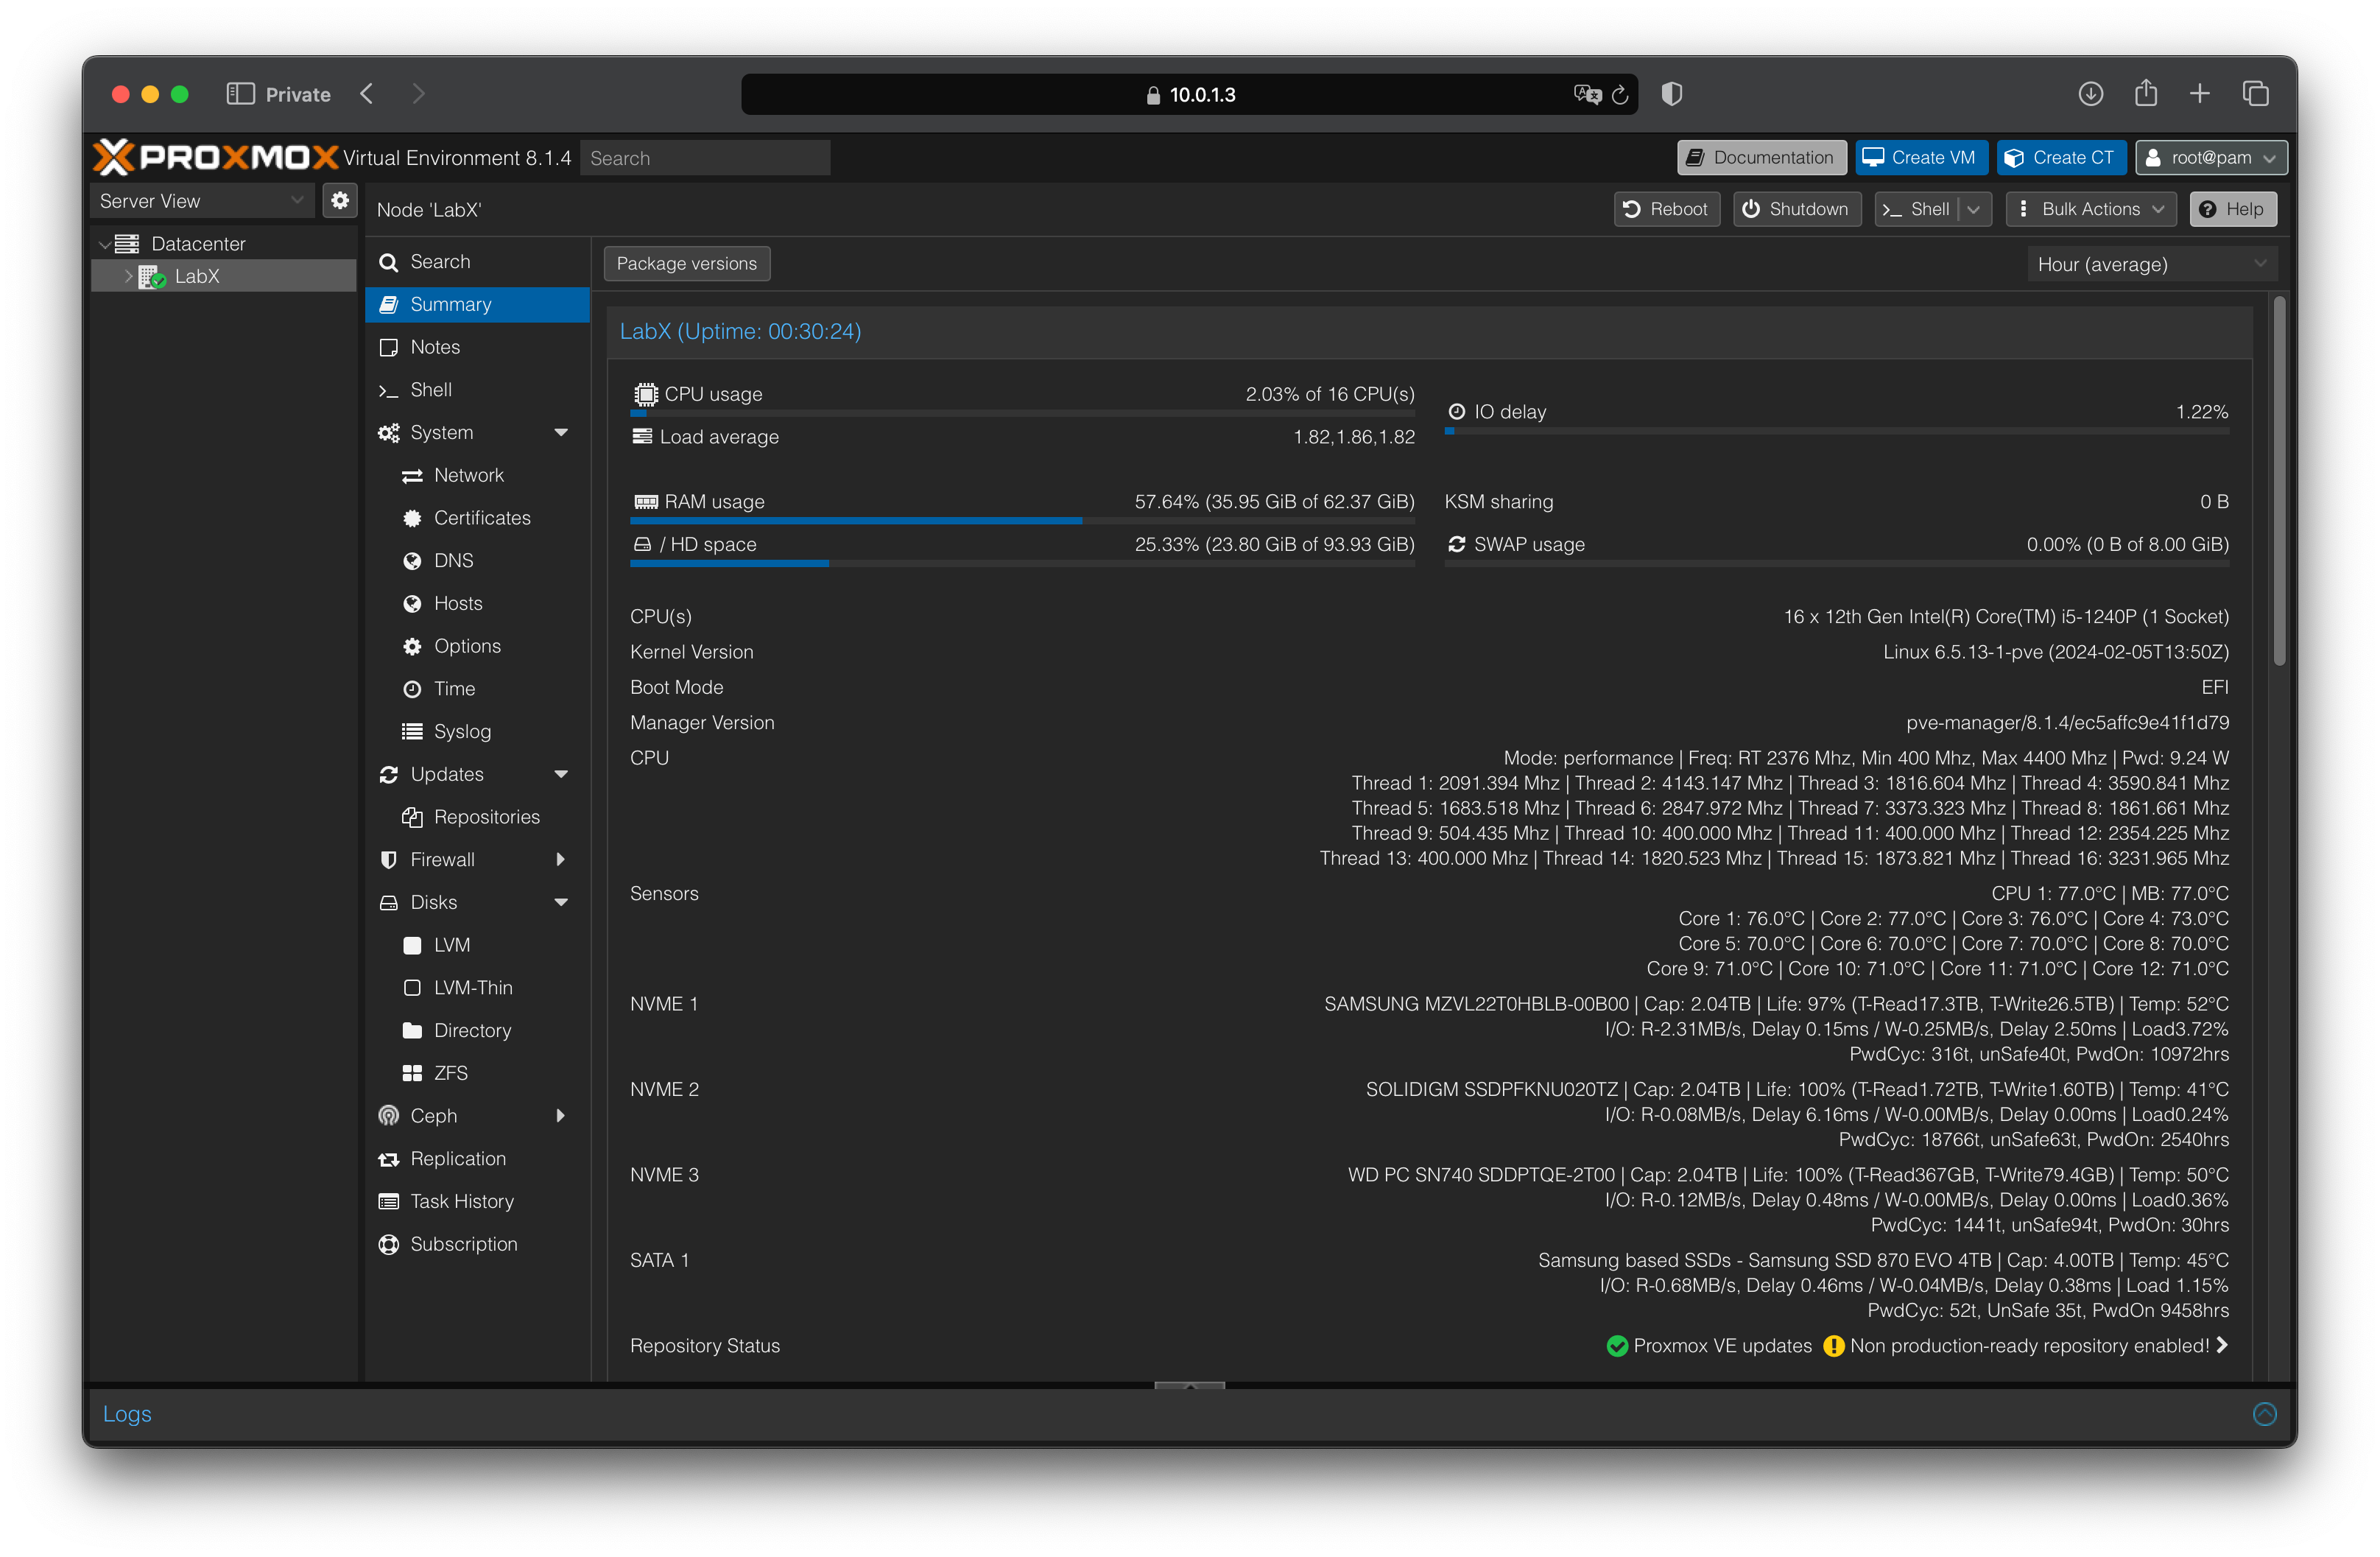
Processor: Intel i5-1240P (12 Cores / 16 Threads, Underclock at 18/28W)

RAM: 64GB

Storage: Total 10TB across four SSDs:

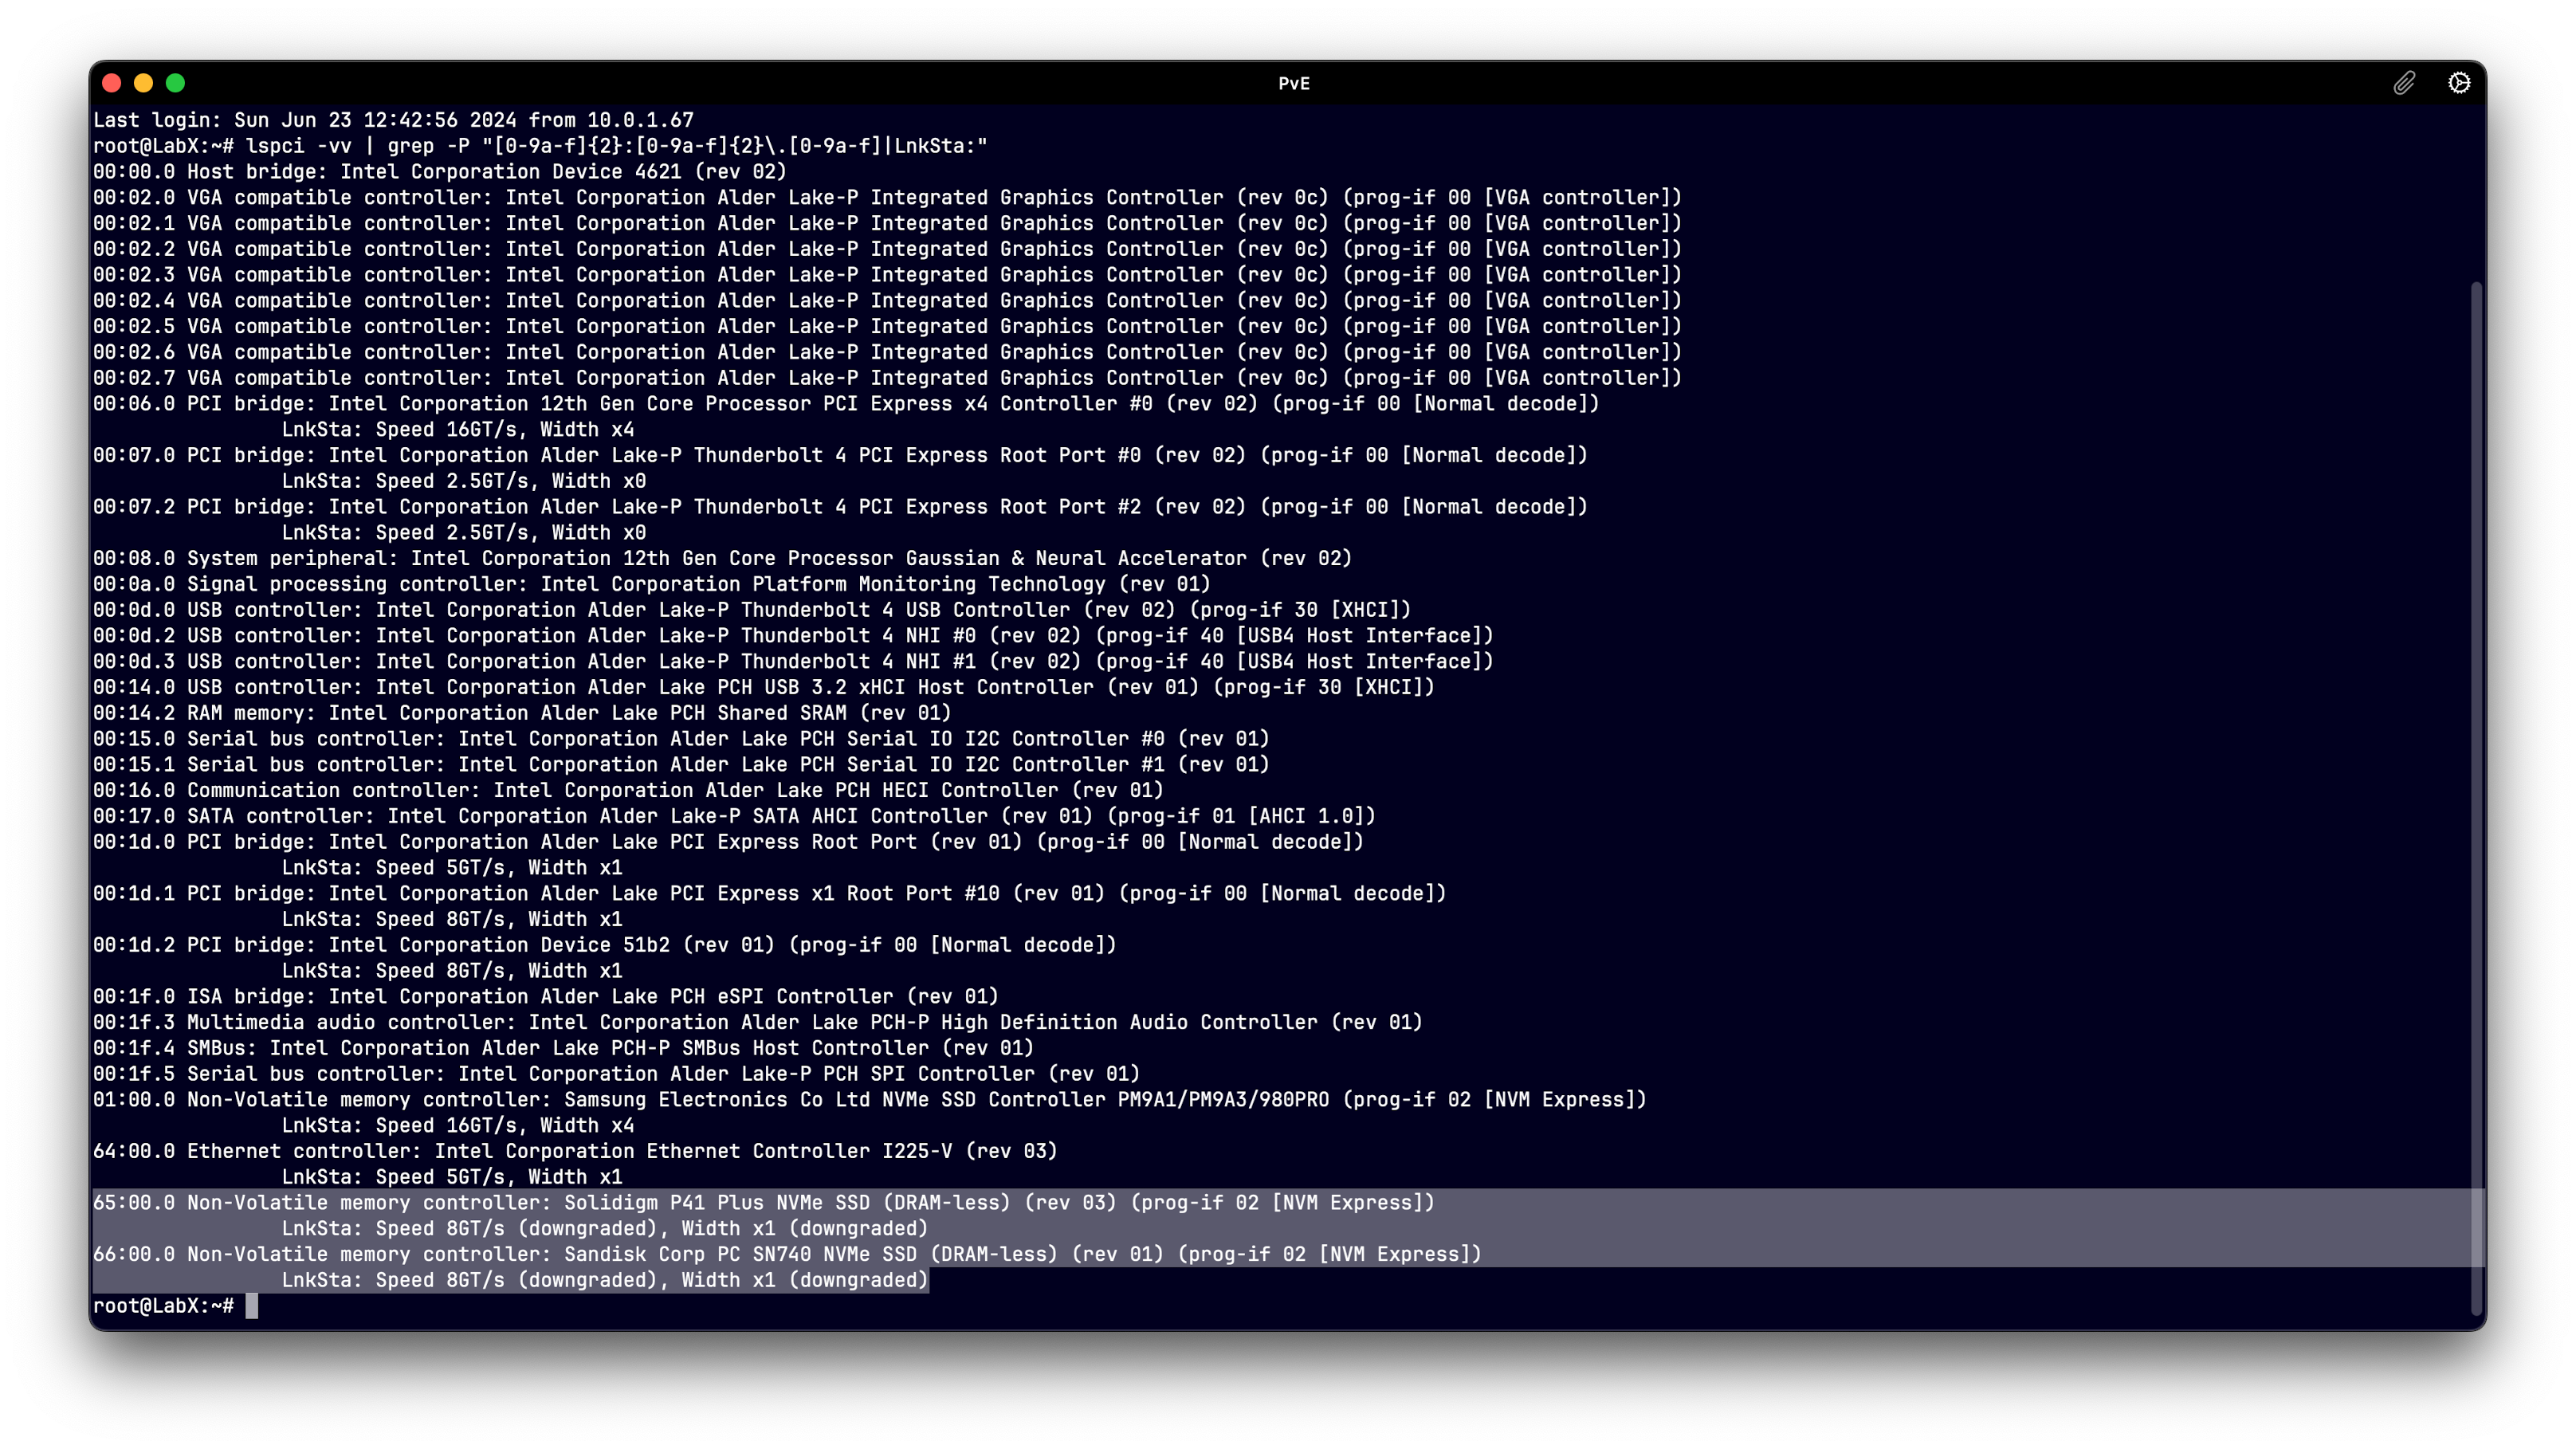
  • Samsung 980Pro 2TB (Gen 4x4) 2280 NVMe SSD
  • Solidigm P41 Plus 2TB (Gen 4x4 Downgraded to Gen 3x1) 2280 NVMe SSD
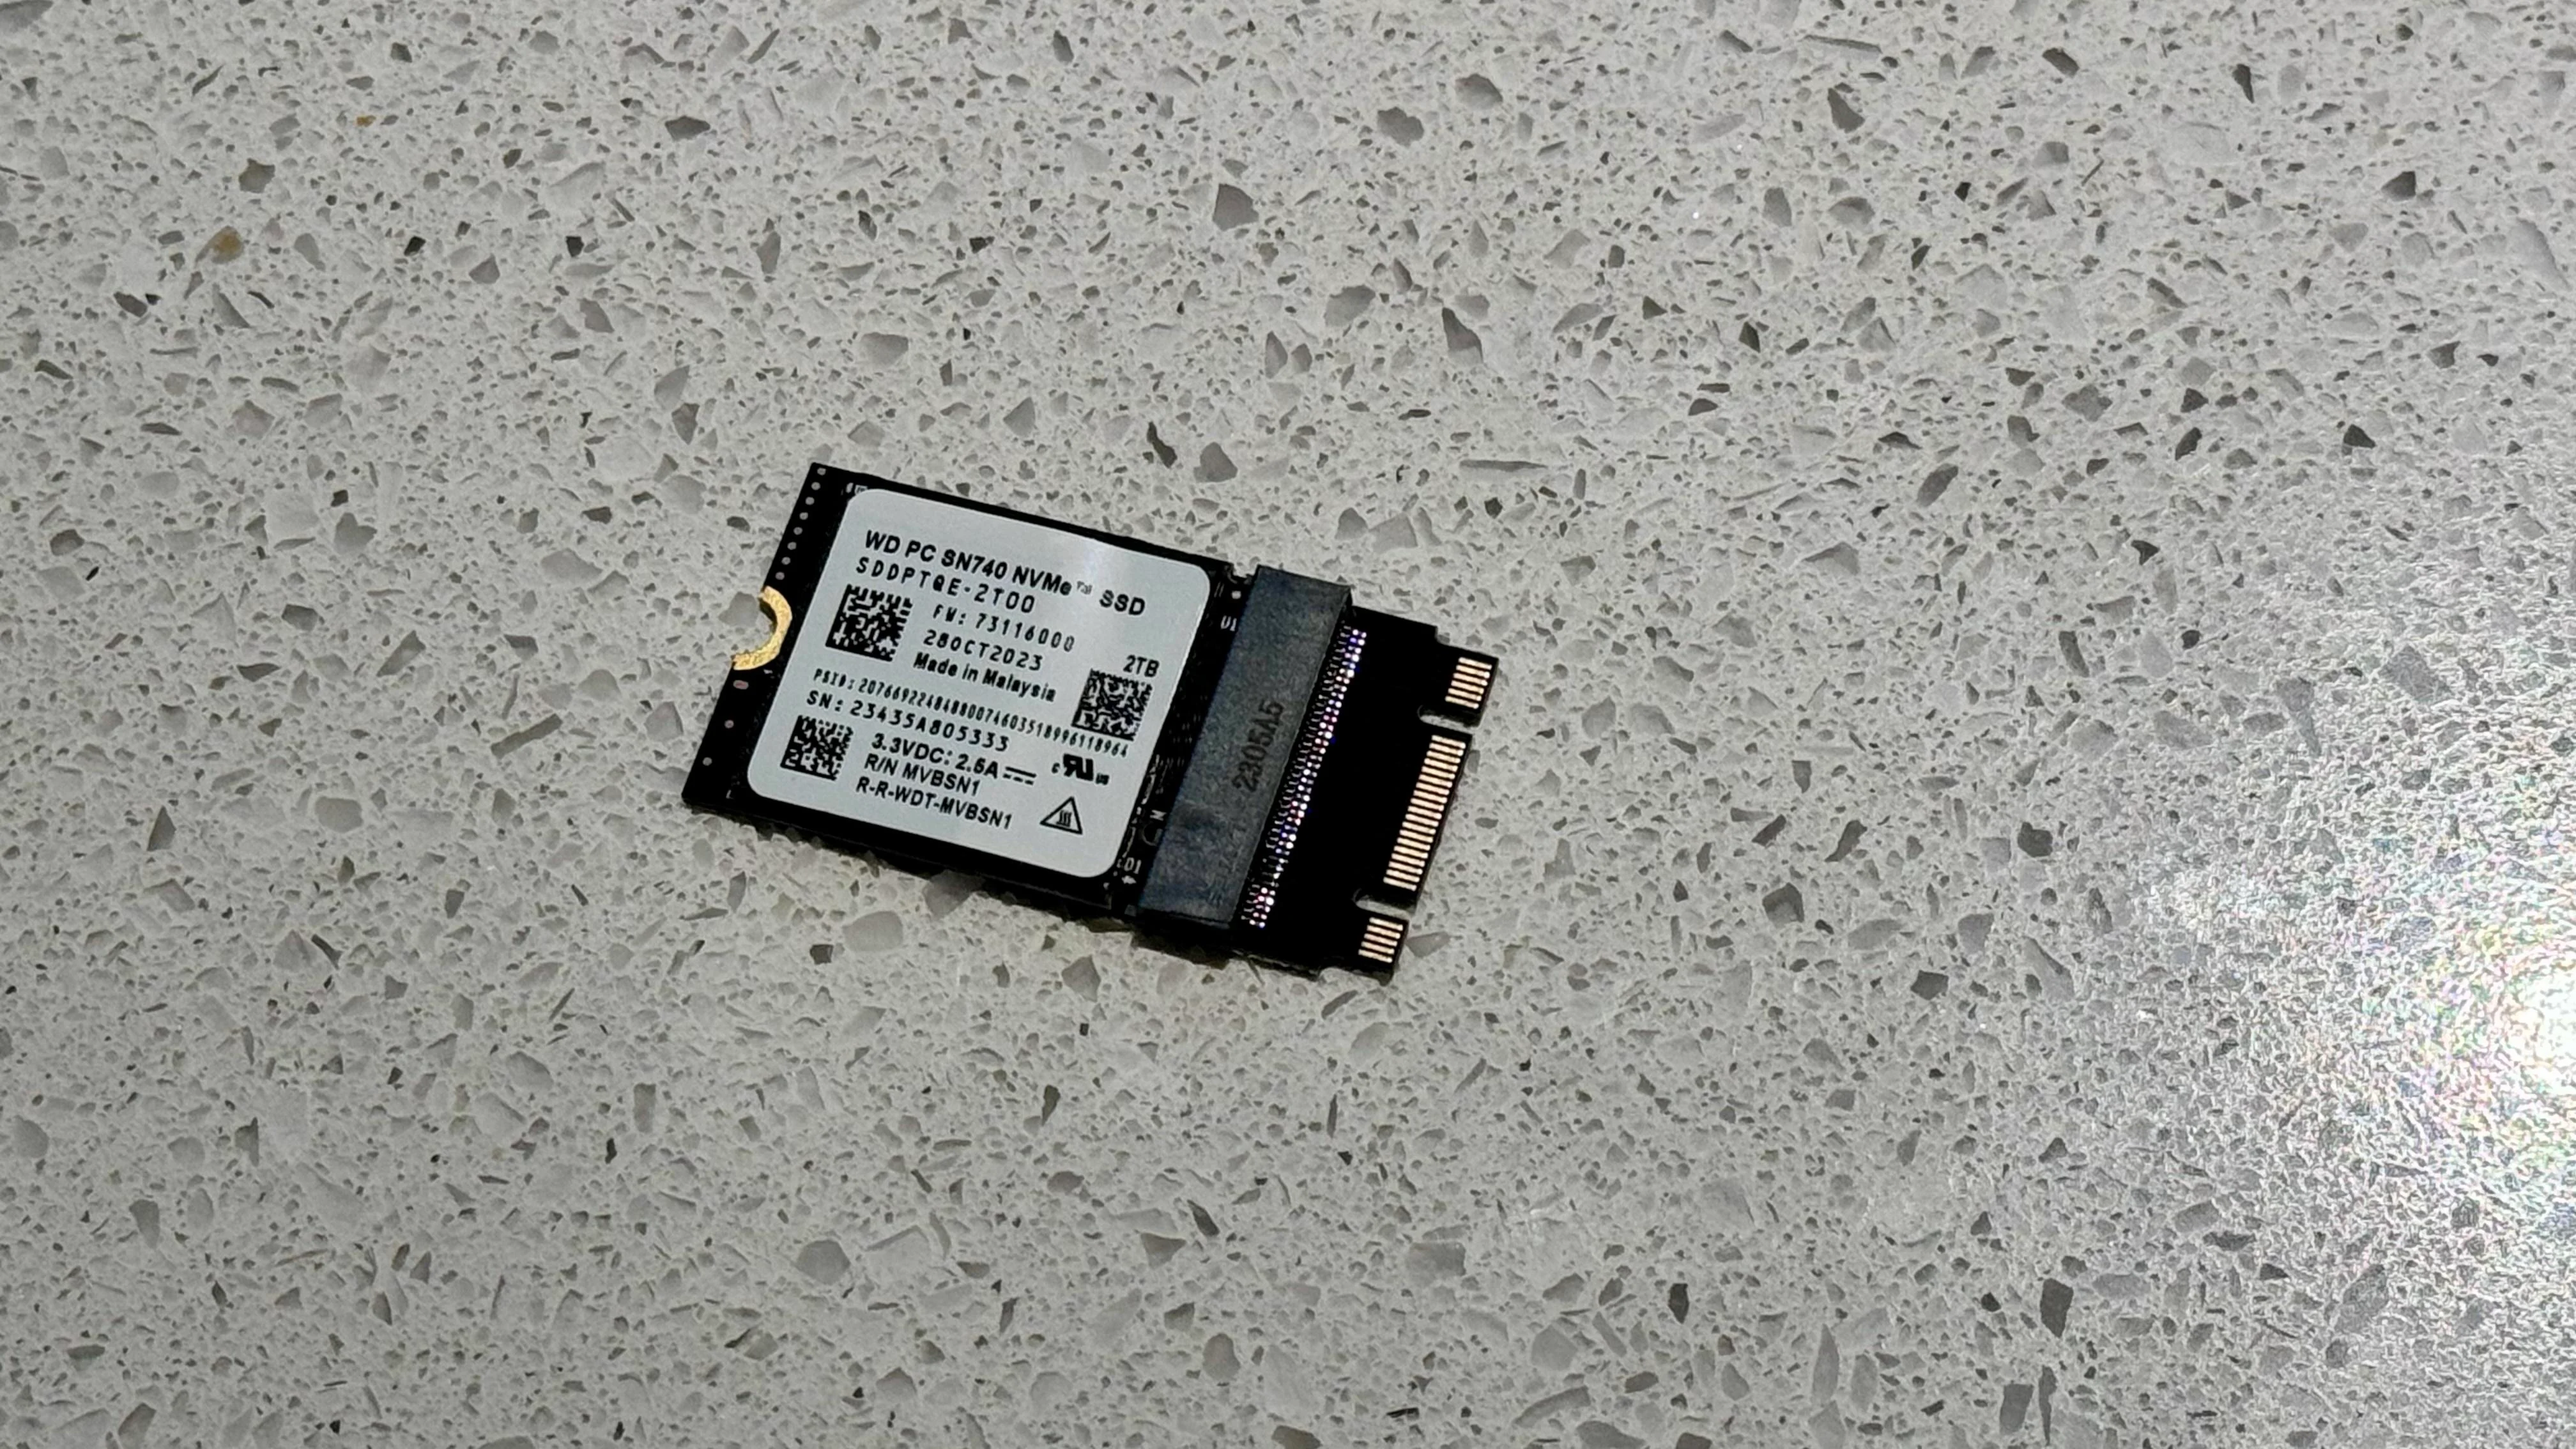
  • Sandisk SN740 2TB (Gen 4x4 Downgraded to Gen 3x1) 2230 NVMe SSD
  • Samsung 870 EVO 4TB SATA SSD

Installation Process

Step 1: Default Configuration

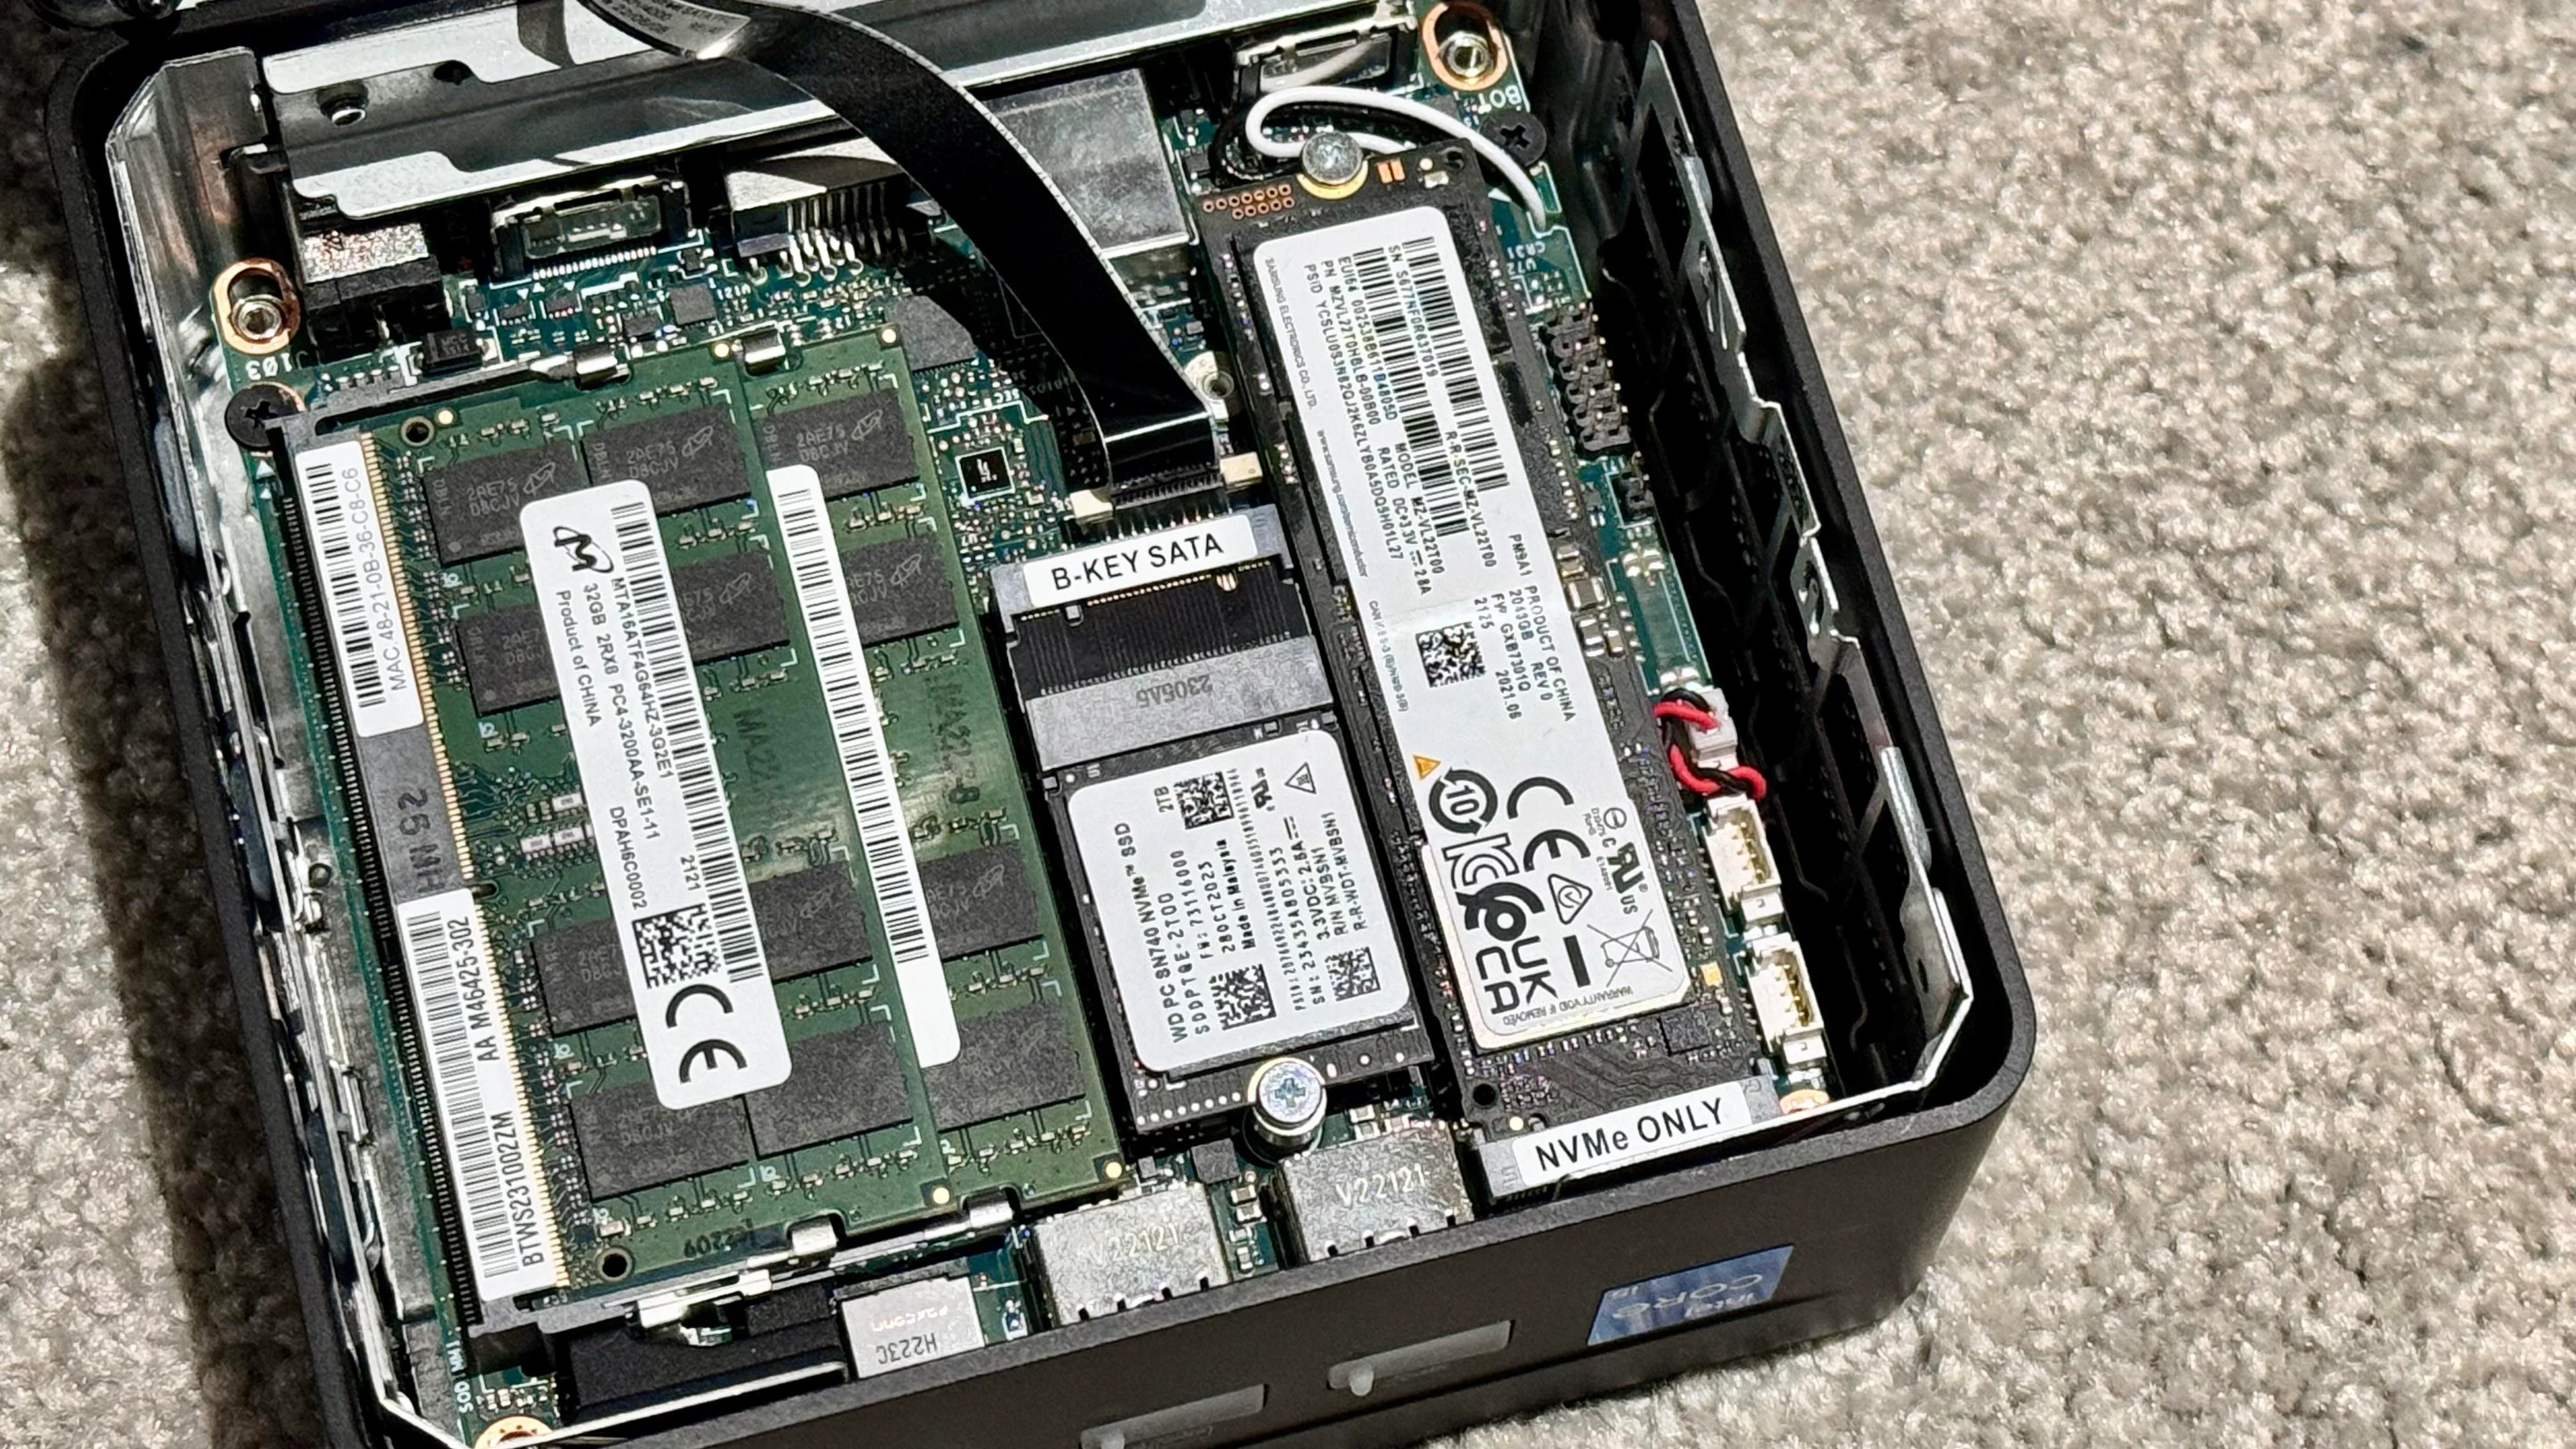
The Intel NUC12 can naturally accommodate two SSDs:

  • M.2 2280 SSD slot: Where I installed the Samsung 980 Pro 2TB.
  • SATA SSD slot: Which houses the Samsung 870 EVO 4TB.

This setup provided me with 6TB of high-speed storage.

Step 2: Maximizing Expandability with M.2 2242 Slot

I discovered that the NUC12’s 2242 M.2 slot includes a PCIe Gen3x1 lane. By using a Key B to Key M converter, this allowed me to connect a Sandisk SN740 2TB as a 2242 form-factor drive.

Note: Connecting the SN740 via Key B scales down its speed from Gen4x4 (5000MB/s) to Gen3x1 (900MB/s).

SSD Conversion

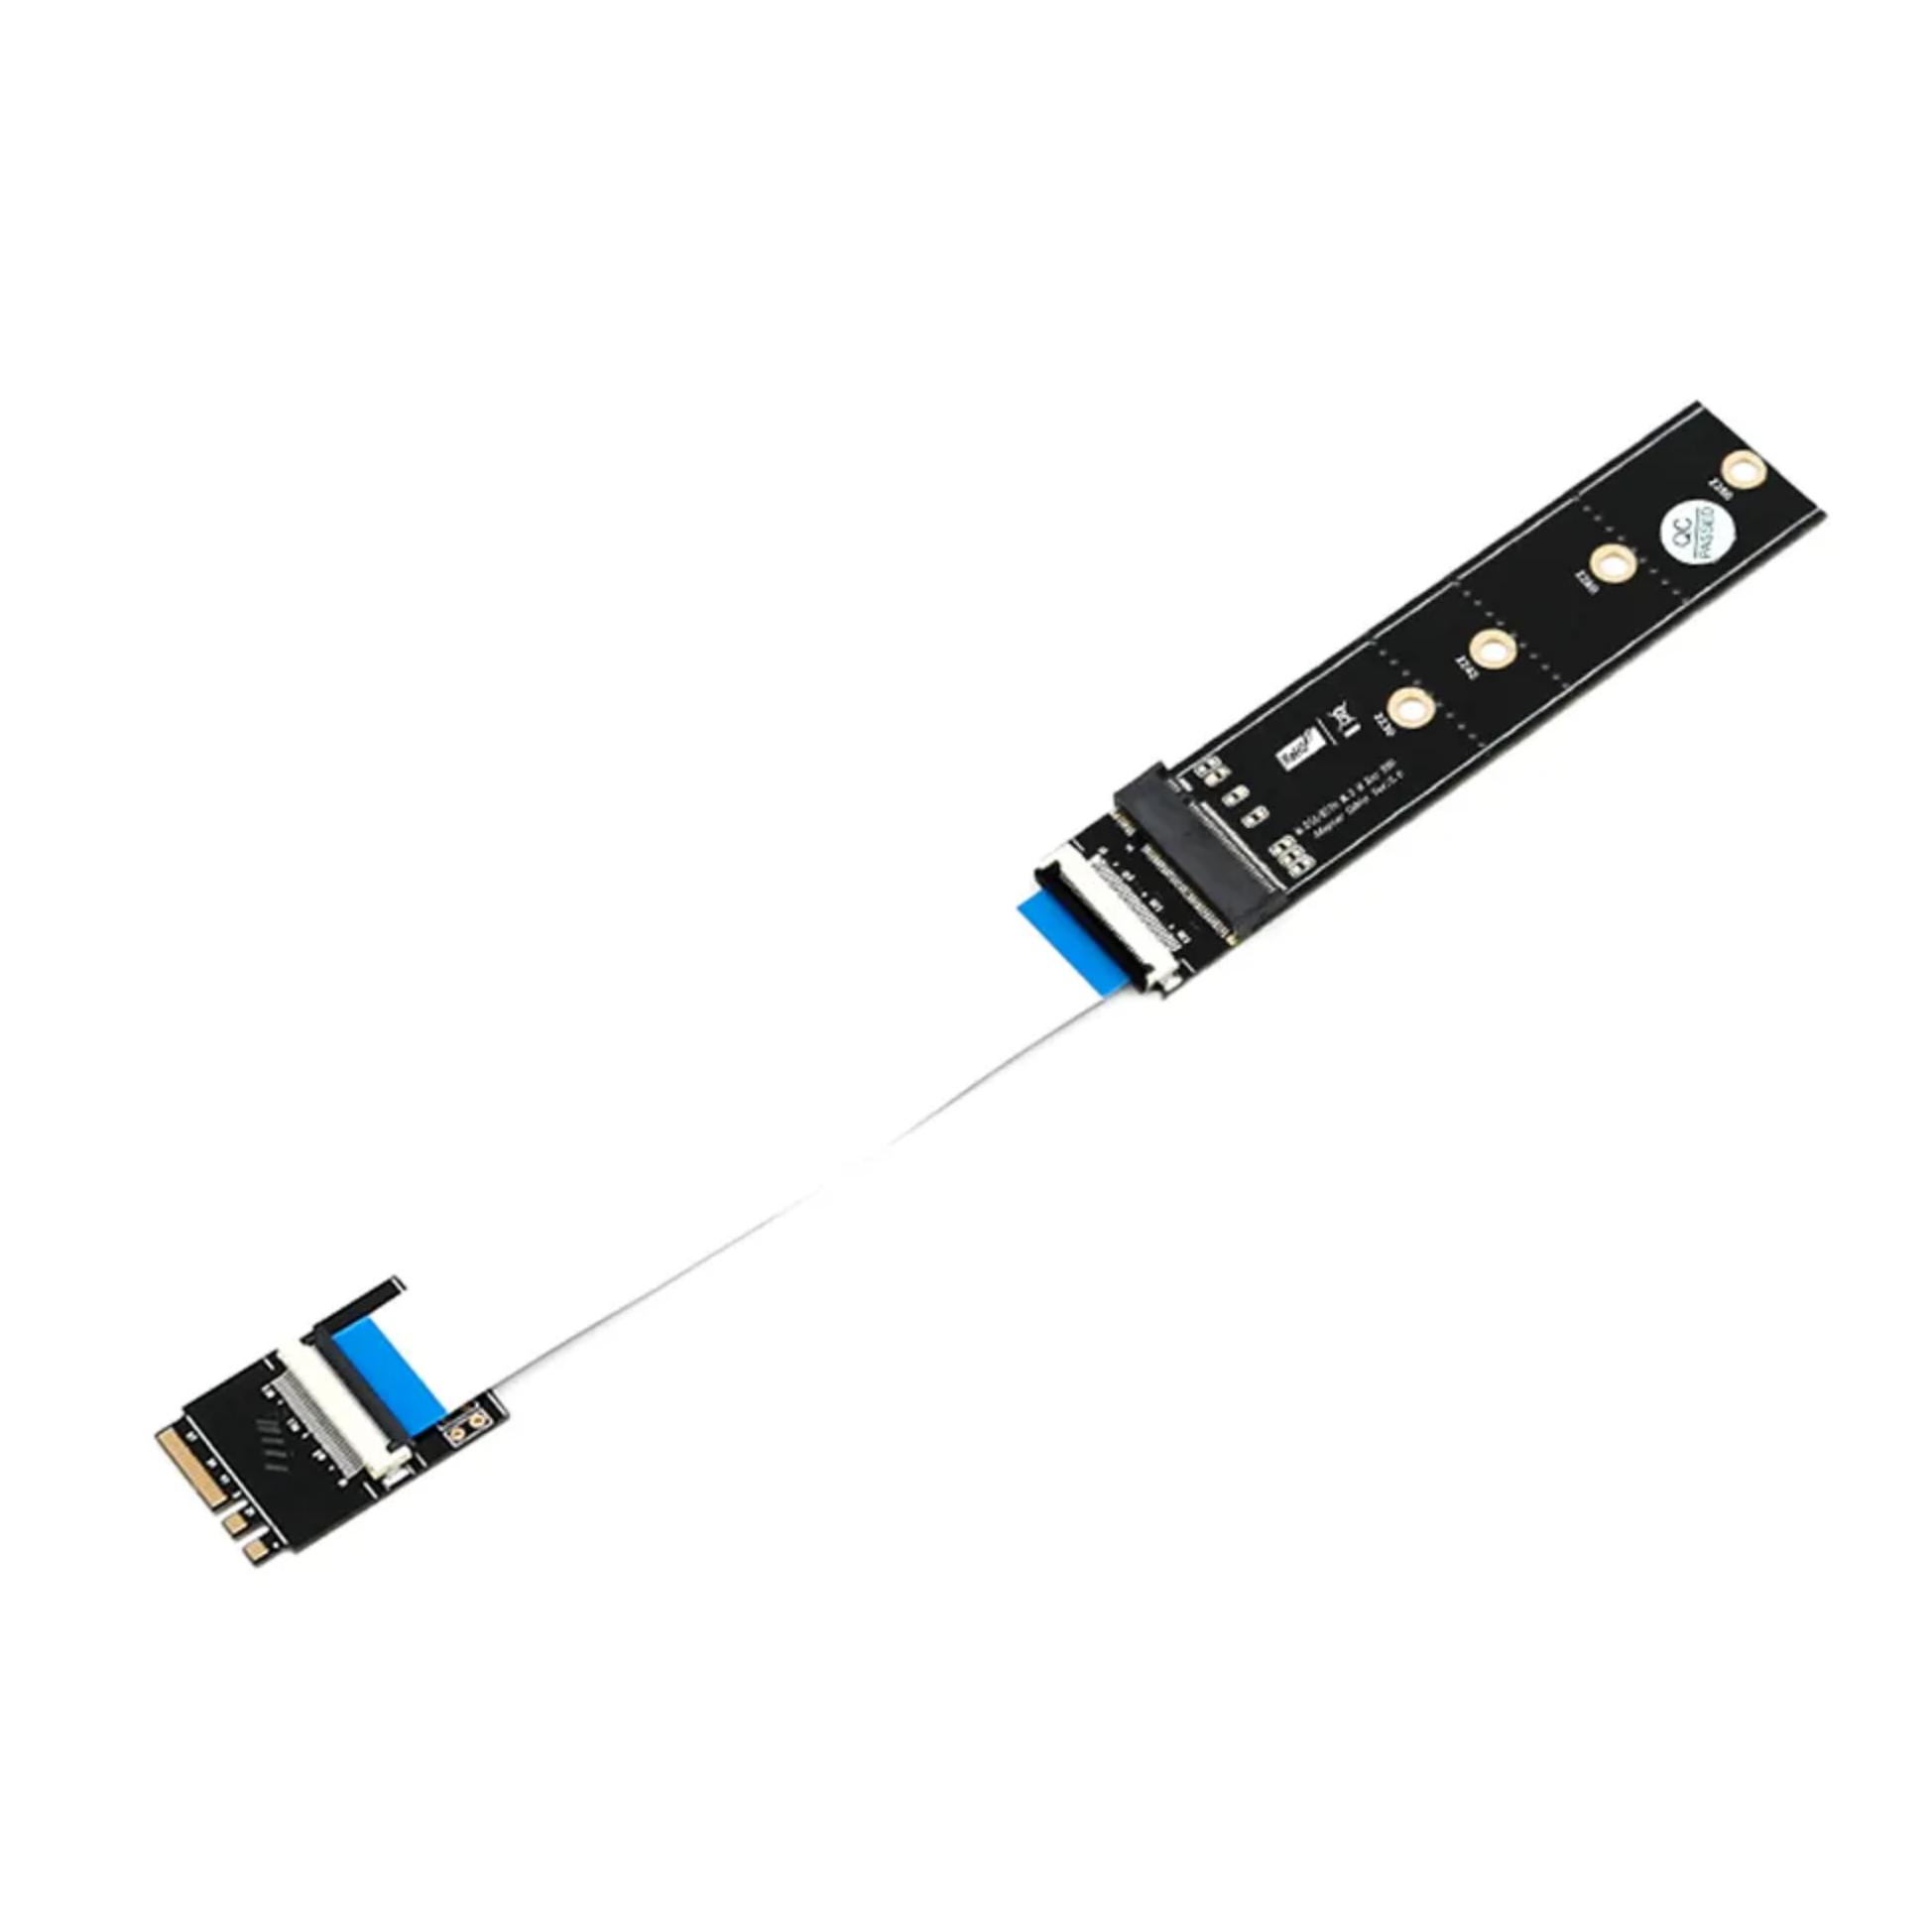
Step 3: Utilizing the WiFi Slot

Since I seldom use the WiFi chip, my HomeLab runs mainly on a 2.5Gbps Ethernet connection. By converting the Key A+E to Key M via another converter, I effectively utilized the WiFi slot’s PCIe Gen3x1 lane. This connected the Solidigm P41 2TB SSD to the WiFi slot via an FFC cable routed to the remaining area designated for the SATA drive, providing an additional 2TB at PCIe Gen3x1 (~900MB/s).

WiFi Slot SSD

Step 4: Underclocking for Optimal Performance

To keep noise and heat in check, I underclocked the Intel i5-1240P CPU to:

  • PL1 = 18W
  • PL2 = 28W

This adjustment still provides 80% of the CPU’s power potential, which is more than sufficient for my workloads. Additionally, the CPU typically operates below a 10% load, thus maintaining an efficient and quiet environment.

CPU Load Overview

Enhancing Capabilities with Thunderbolt 4 Ports

The NUC12 also features 2 Thunderbolt 4 ports, each offering a 40Gbps link. This provides the flexibility to expand storage further by connecting to external SSD enclosures or HDD RAID setups—potentially accommodating up to 8x10Gbps (Gen3x1) external SSDs via TB3/4 4-bay enclosures.

Thunderbolt 4 Ports

Conclusion

By fully utilizing the Gen4x4 M.2 slot, SATA slot, Gen3x1 2242 slot, and the Gen3x1 WiFi slot, I successfully installed four SSDs into a single 4x4 NUC12 with ease. This setup provides an impressive 10TB of high-speed storage in a remarkably compact form factor.

Completed HomeLab

I am thrilled with how compact yet powerful the Intel NUC12 1240P has proven to be for this HomeLab build. It not only meets my storage needs but also leverages advanced features for potential future expansions.

Feel free to share your thoughts or ask questions in the comments below. Happy building!

Monitoring the health and temperature of your SSDs is crucial in any high-performance environment, such as a VMware ESXi server. In the latest ESXi 8.0, you can easily check the SSD temperature and SMART data using the esxcli command-line tool. This blog post will guide you through creating a simple shell script to automate this task.

Creating a Shell Script to Check SSD Temperature

To simplify the process, we can create a shell script named temp.sh. This script will fetch and display the temperature of all SSDs connected to your ESXi server.

Step-by-Step Guide

  1. Create the shell script file:

    Log in to your ESXi server and open a terminal. Then use your favorite text editor (like vi) to create the script file.

    1
    vi /usr/local/bin/temp.sh
  2. Insert the Script Content:

    Copy and paste the following content into the temp.sh file:

    1
    2
    3
    4
    5
    6
    7
    8
    9
    10
    11
    12
    #!/bin/sh

    # Get the list of all device UIDs
    device_list=$(esxcli storage core device list | grep -E '^t10.|^eui.' | awk '{print $1}')

    # Iterate through each device UID and fetch its temperature
    for device in $device_list
    do
    output=$(esxcli storage core device smart get -d $device)
    temperature=$(echo "$output" | grep "Drive Temperature" | awk '{print $3}')
    echo "Drive Temperature for device $device: $temperature°C"
    done
  3. Make the Script Executable:

    Change the file permissions to make the script executable.

    1
    chmod +x /usr/local/bin/temp.sh
  4. Run the Script:

    Execute the script to display the temperature of each SSD.

    1
    /usr/local/bin/temp.sh

Understanding the Script

Fetching Device UIDs:

1
device_list=$(esxcli storage core device list | grep -E '^t10.|^eui.' | awk '{print $1}')

This line extracts all device UIDs (Universal Identifiers) from the ESXi storage core device list.

Iterating Through Devices:

1
2
for device in $device_list
do

This for loop iterates through each device UID.
Getting SMART Data:

1
output=$(esxcli storage core device smart get -d $device)

This line fetches the SMART data for each device.
Extracting Temperature:

1
2
temperature=$(echo "$output" | grep "Drive Temperature" | awk '{print $3}')
echo "Drive Temperature for device $device: $temperature°C"

These lines extract the drive temperature from the SMART data and print it.

Checking Additional SMART Attributes

In addition to temperature, SMART data provides a wealth of information about the health of your SSDs. To view all SMART attributes for a specific device, use the following command:

1
esxcli storage core device smart get -d

This command will display important metrics such as:

• Read Error Rate
• Power On Hours
• Reallocated Sectors Count
• Wear Leveling Count

Conclusion

Keeping track of your SSD’s temperature and overall health is crucial to maintaining the reliability and performance of your VMware ESXi server. By creating and using the temp.sh script, you can quickly and easily monitor these important metrics.

If you have any questions or need further assistance, feel free to ask in the comments below. Don’t forget to share this post if you found it helpful. Stay tuned for more tips and tricks on managing your ESXi environment!

Happy monitoring!

0%