Upinel Notebook

Code, Homelab, and everything tech

UniFi 2024 HomeLab Home Network Buying Guide
UniFi

UX1

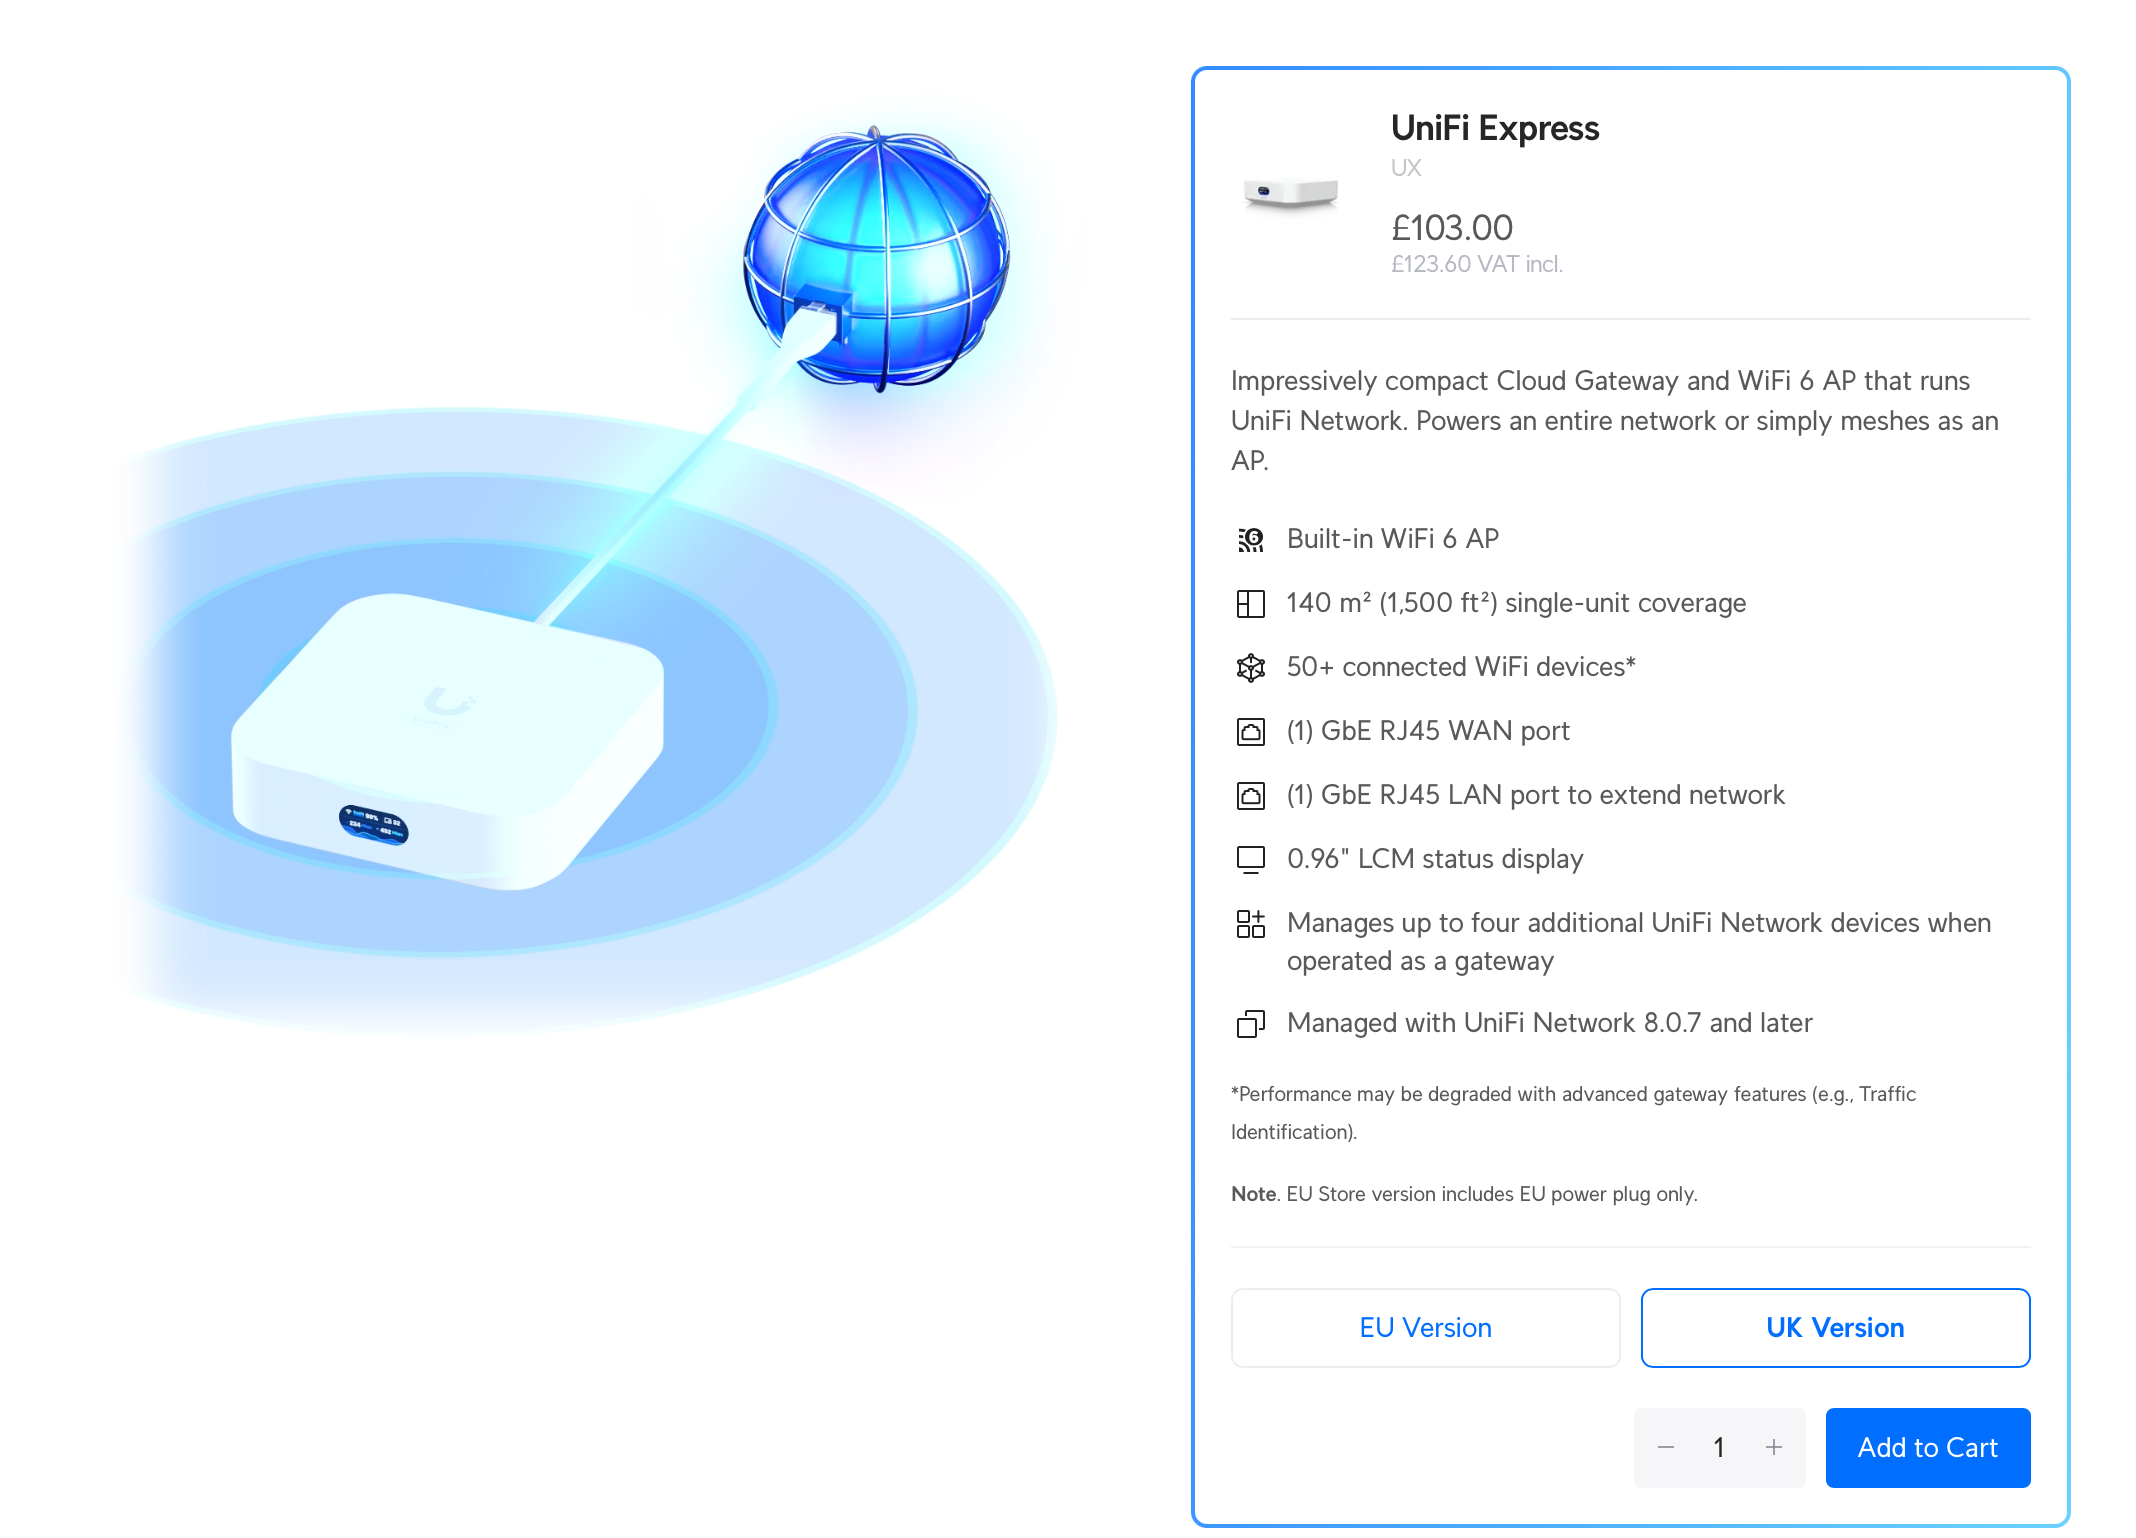
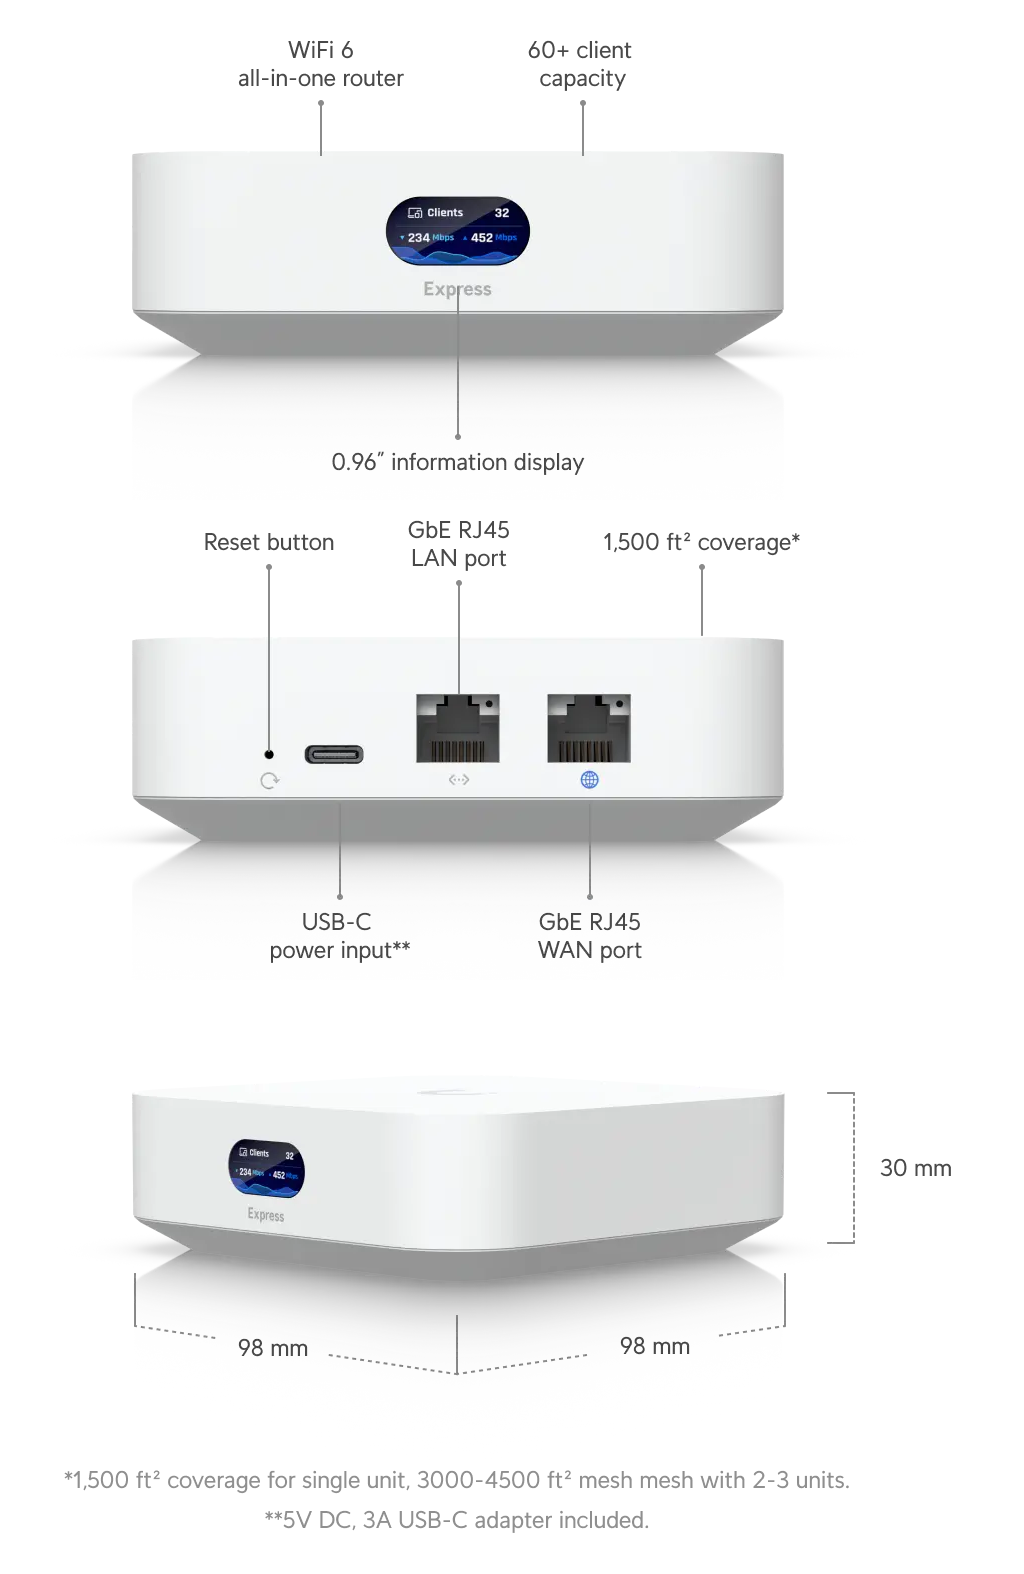
Entry-Level: UniFi Express (£123) (Not recommended: UDR)

Those who want a stable wireless network environment and want to start experiencing enterprise/Prosumer-level network setups (vLAN, VPN, Static Route, Multiple SSID, Conditional Network Settings, etc.).

Limitations

  • 1Gbps network
  • No IPS/IDS
  • Only one LAN port, but can connect to a switch to increase LAN ports
  • Supports a maximum of 5 UniFi Network devices for unified management (in practice, using an unmanaged switch increases the limit).
    UX2

Why Not UDR?

Due to inherent limitations, UDR’s WAN can only go up to 700Mbps, and its CPU performance isn’t great. If you install UniFi Protect, it will slow down even more. Hence, for just network needs, UniFi Express is the better choice.
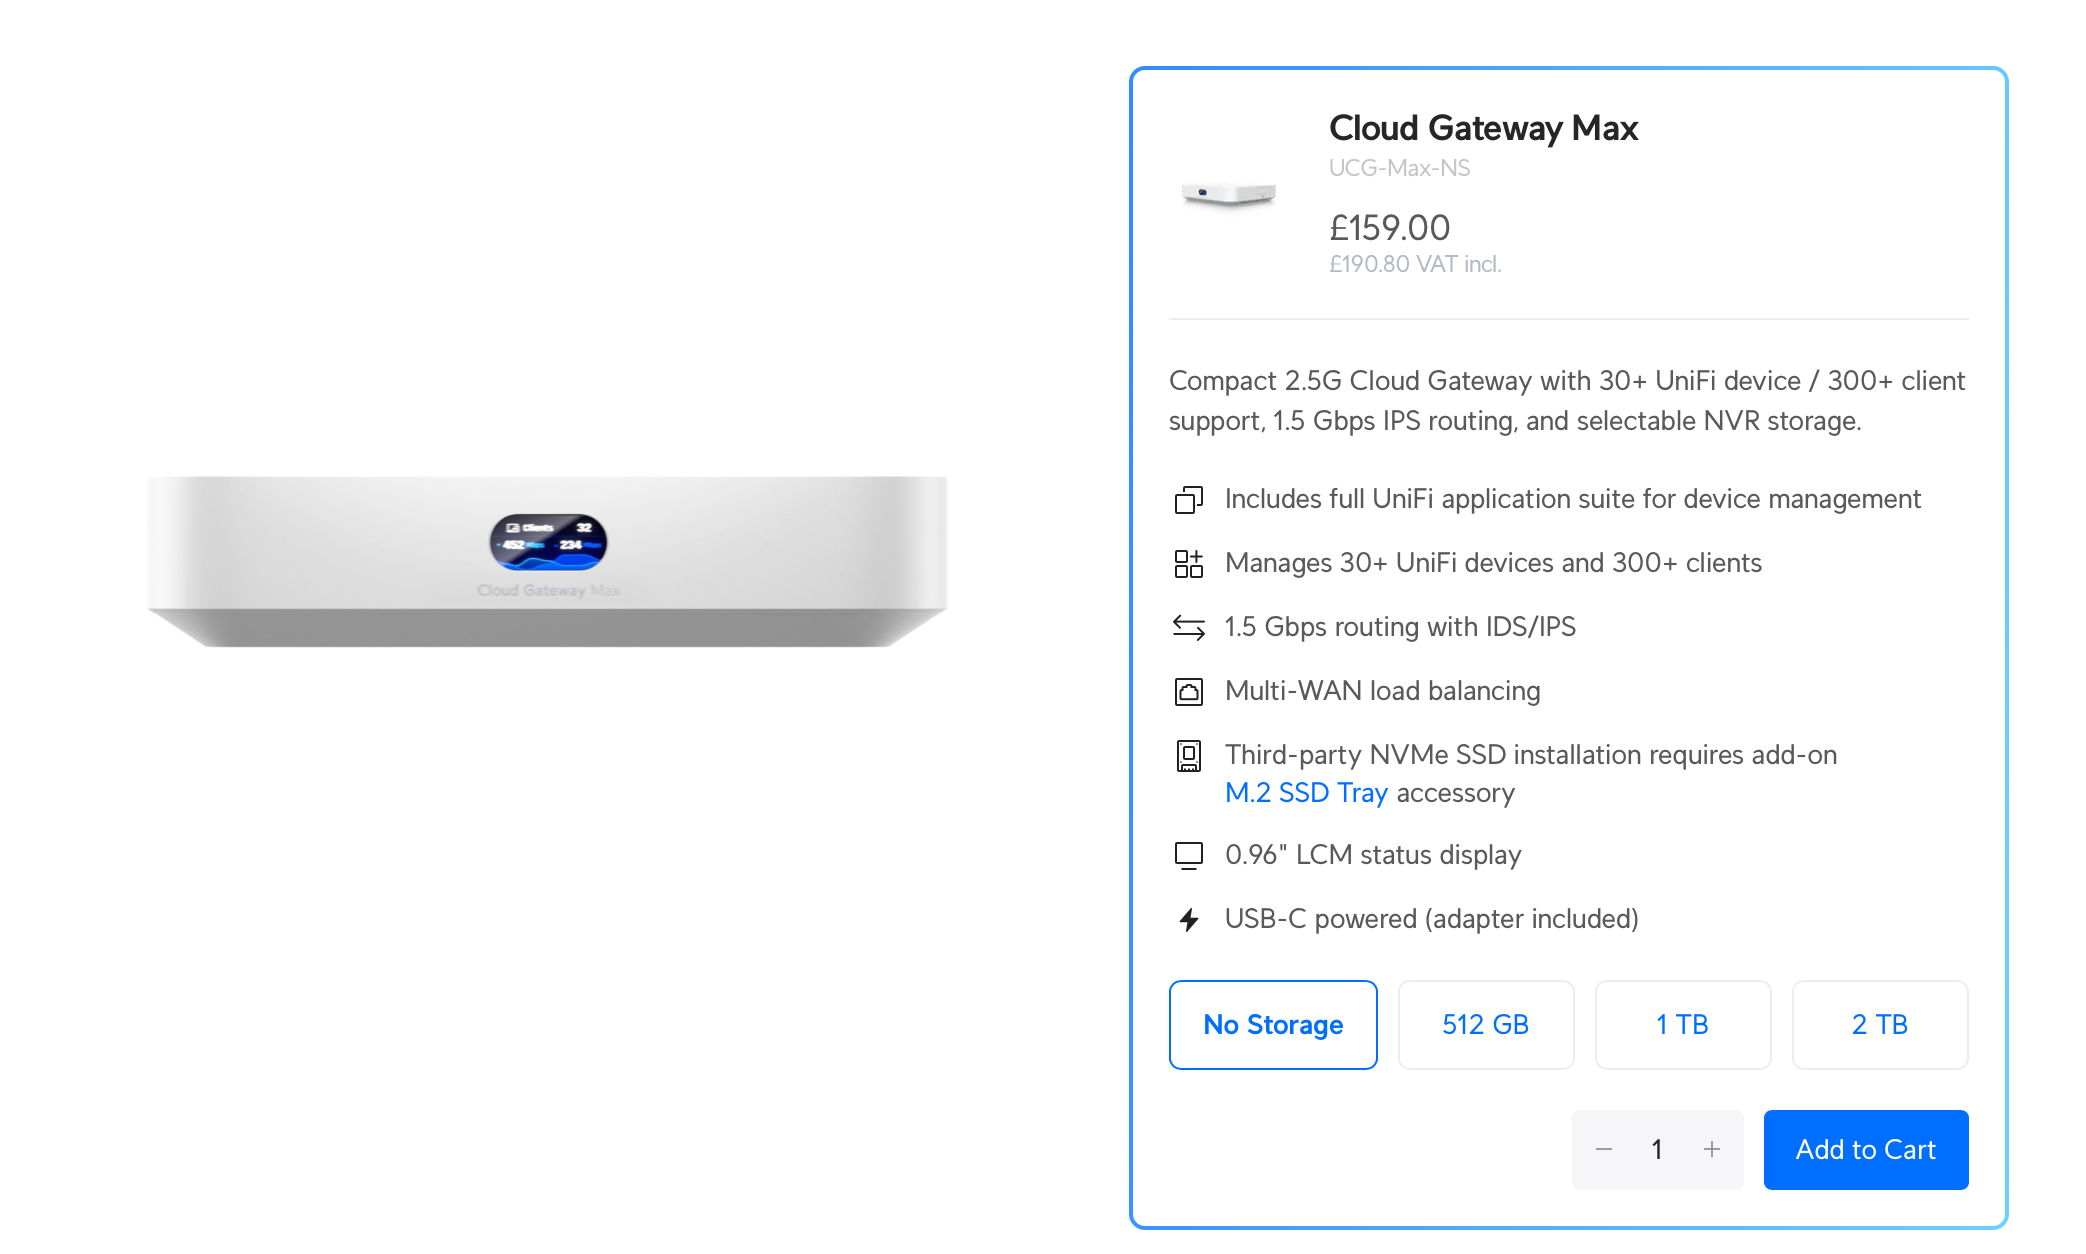
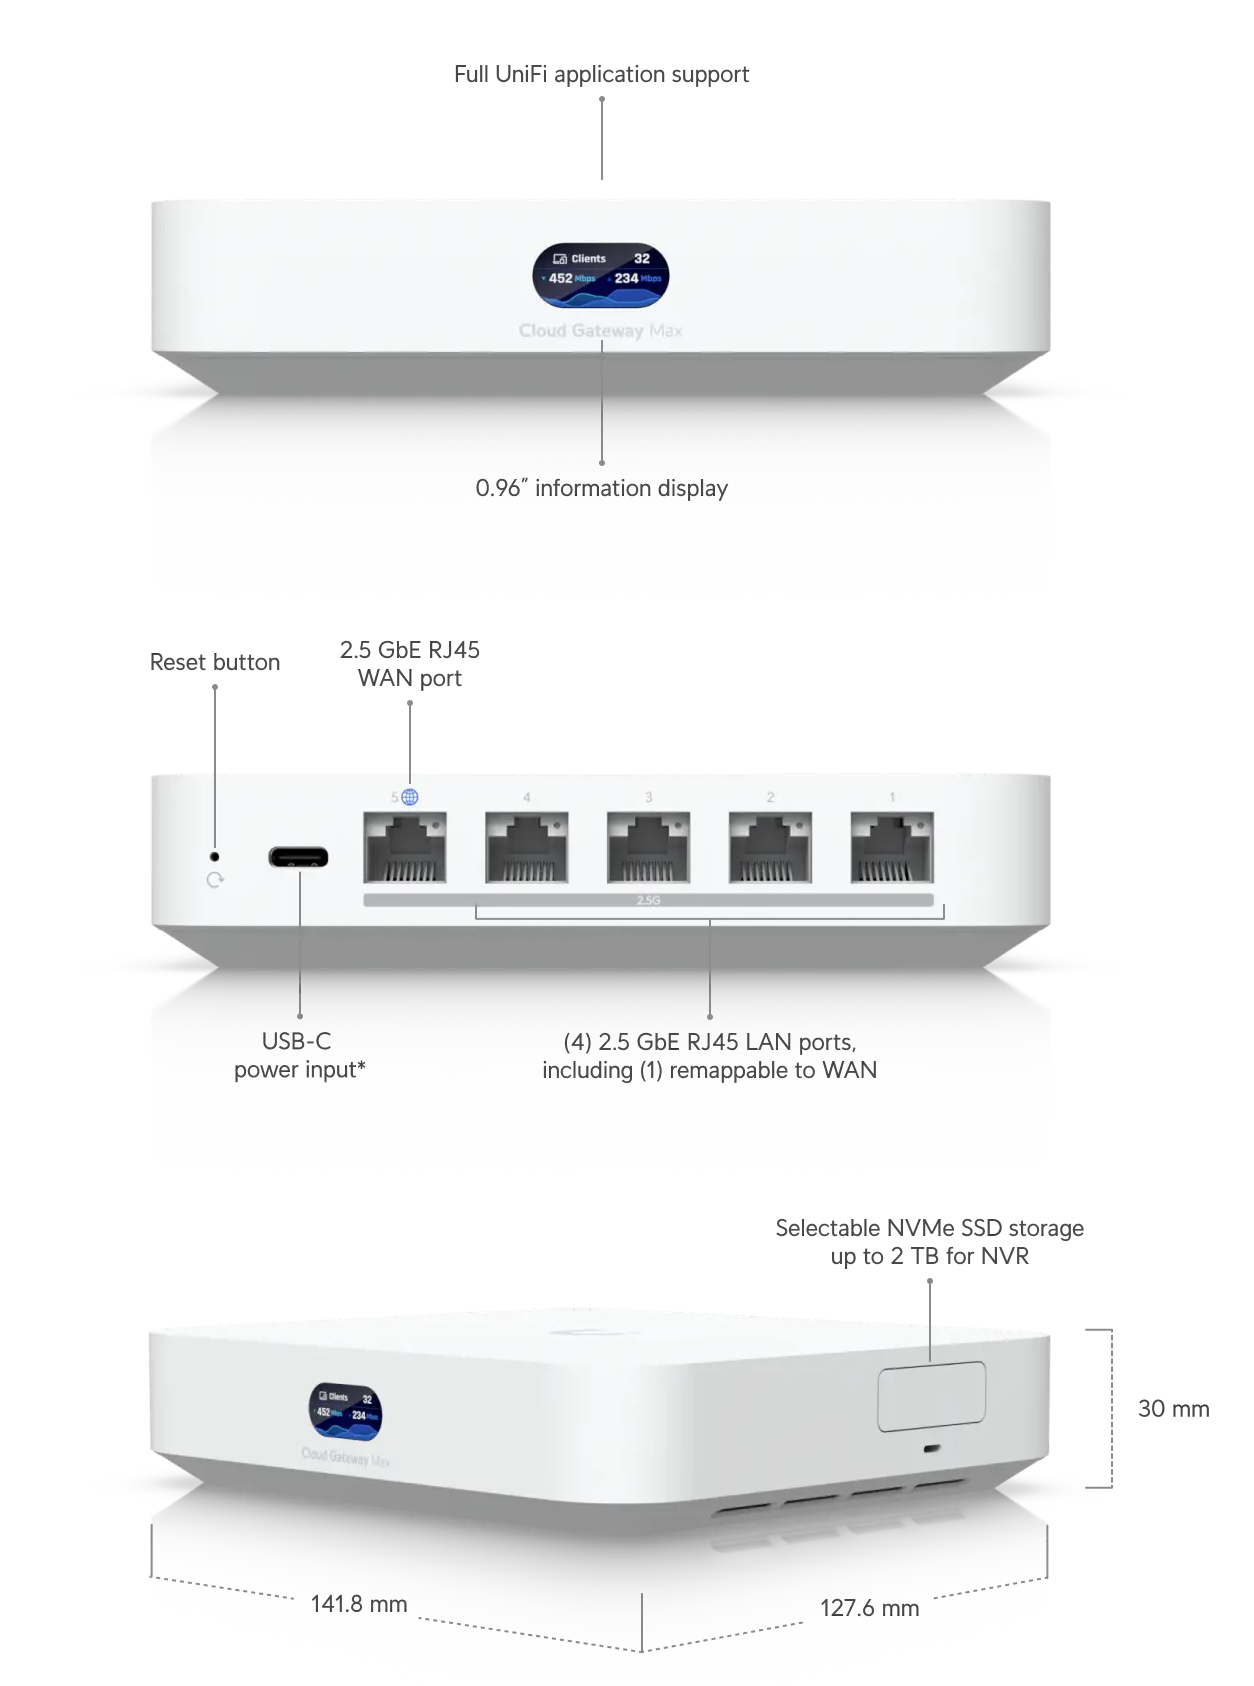
UCG-Max1

  • Those who need IPS/IDS
  • Need 2.5Gbps WAN/LAN
  • Require Dual WAN backup
  • Or need UniFi Protect (Surveillance Camera) / UniFi Access / UniFi Talk, etc.

Limitations

  • Besides lacking a 10Gbps WAN port, there are minimal limitations, making this a great choice for home use.
    UCG-Max1

Why Not Cloud Gateway Ultra?

Although it has a 2.5Gbps WAN, due to inherent limitations, the LAN and backplane bandwidth is only 1Gbps, it can’t run UniFi Protect, and it doesn’t have built-in WiFi, feeling somewhat in-between. It’s better to opt for either Express for network needs or Cloud Gateway Max if Protect is required. Of course, if you clearly know your requirements (e.g., running 5+ APs), it’s okay to buy it.
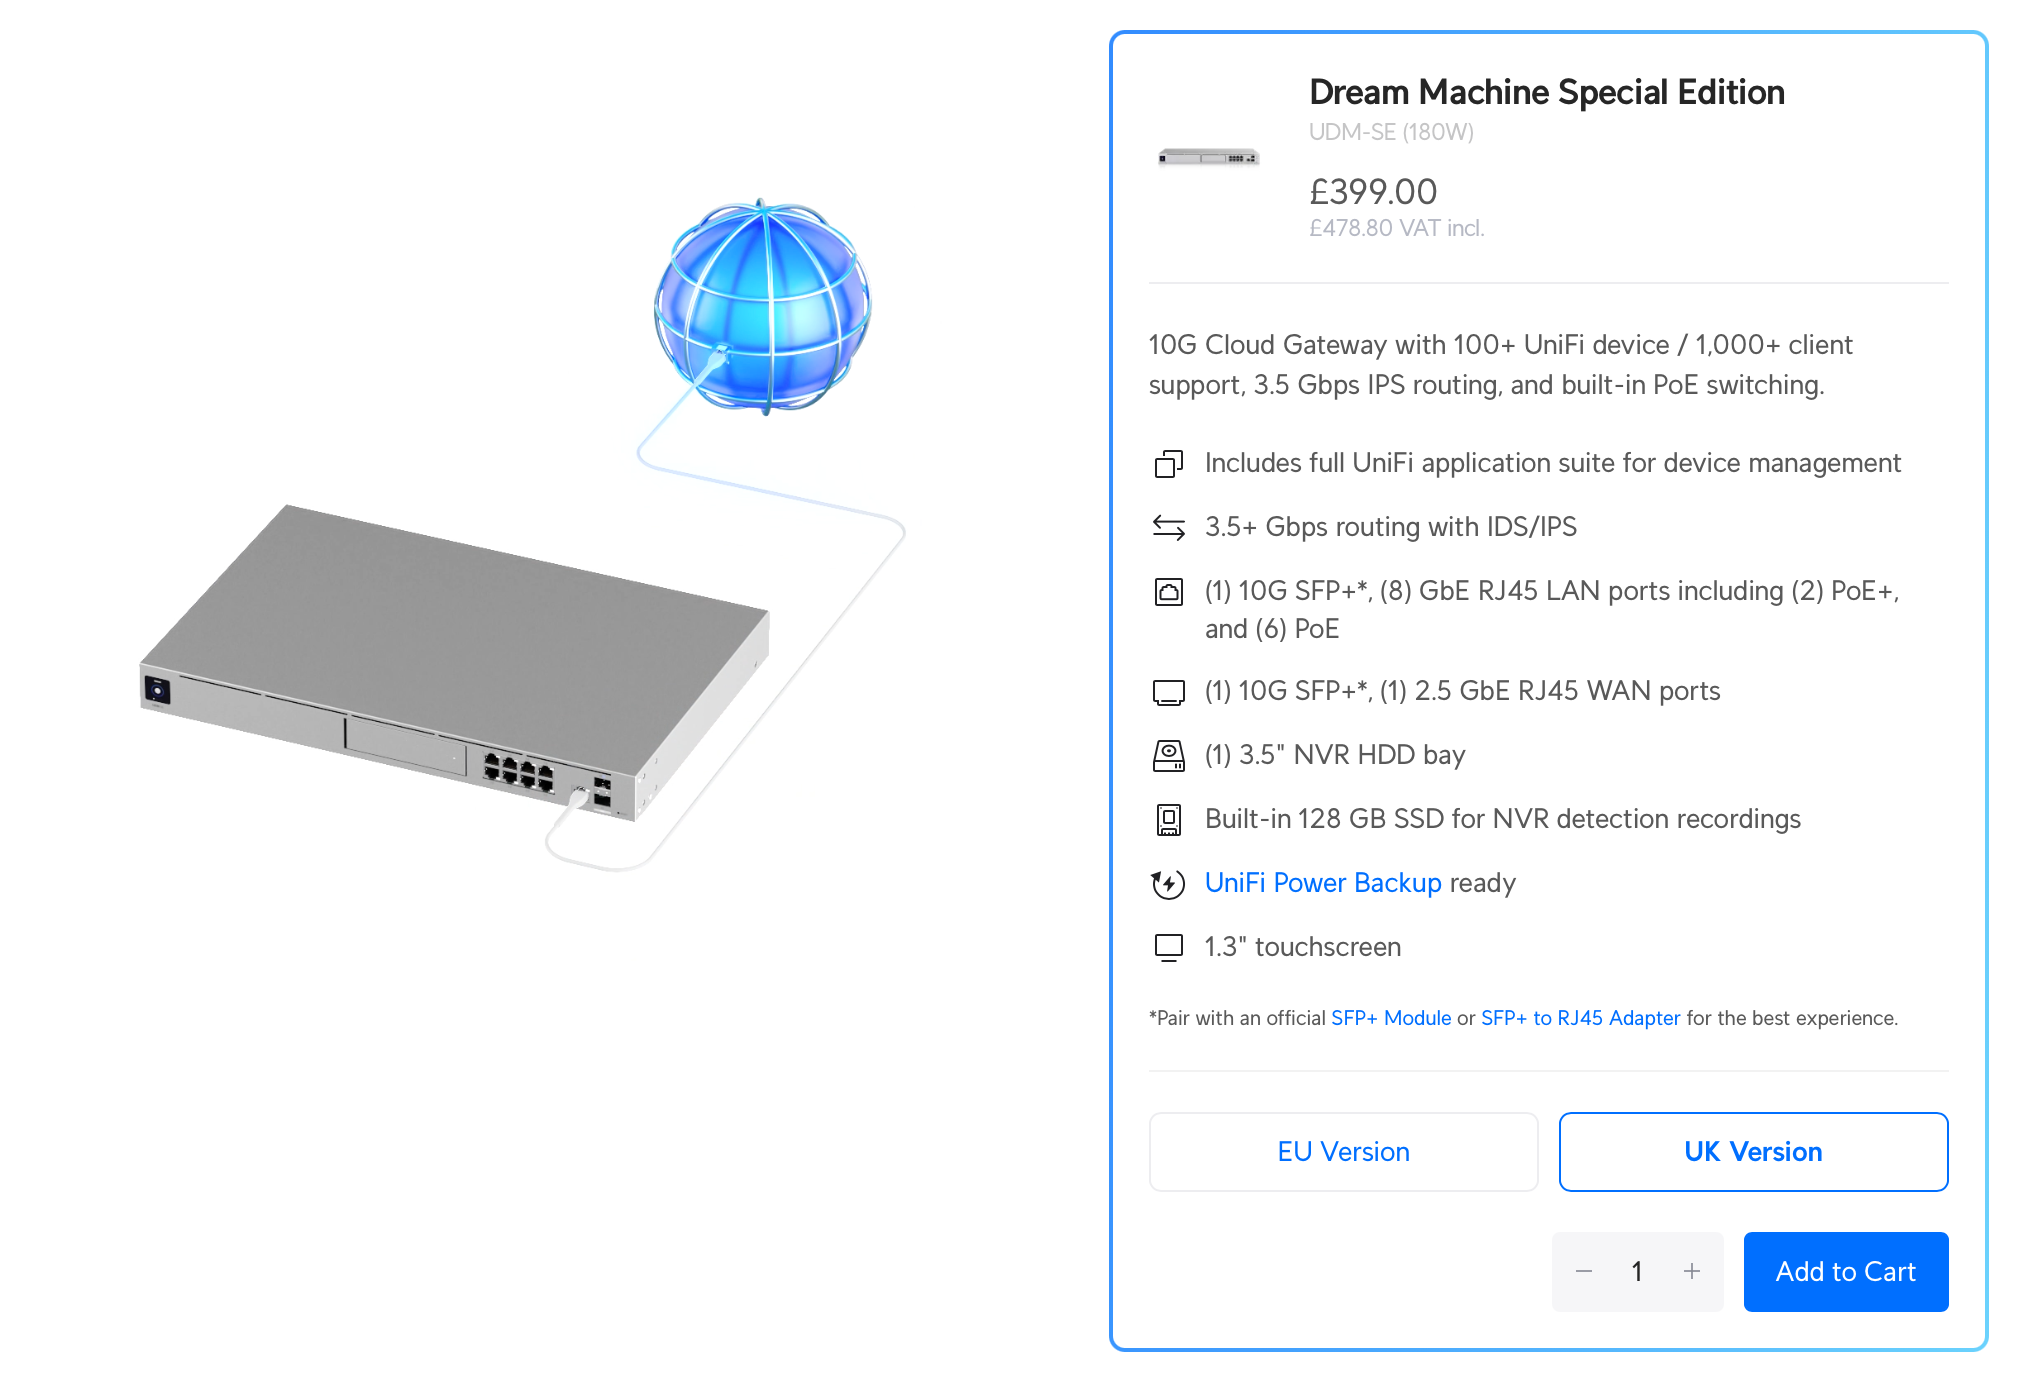
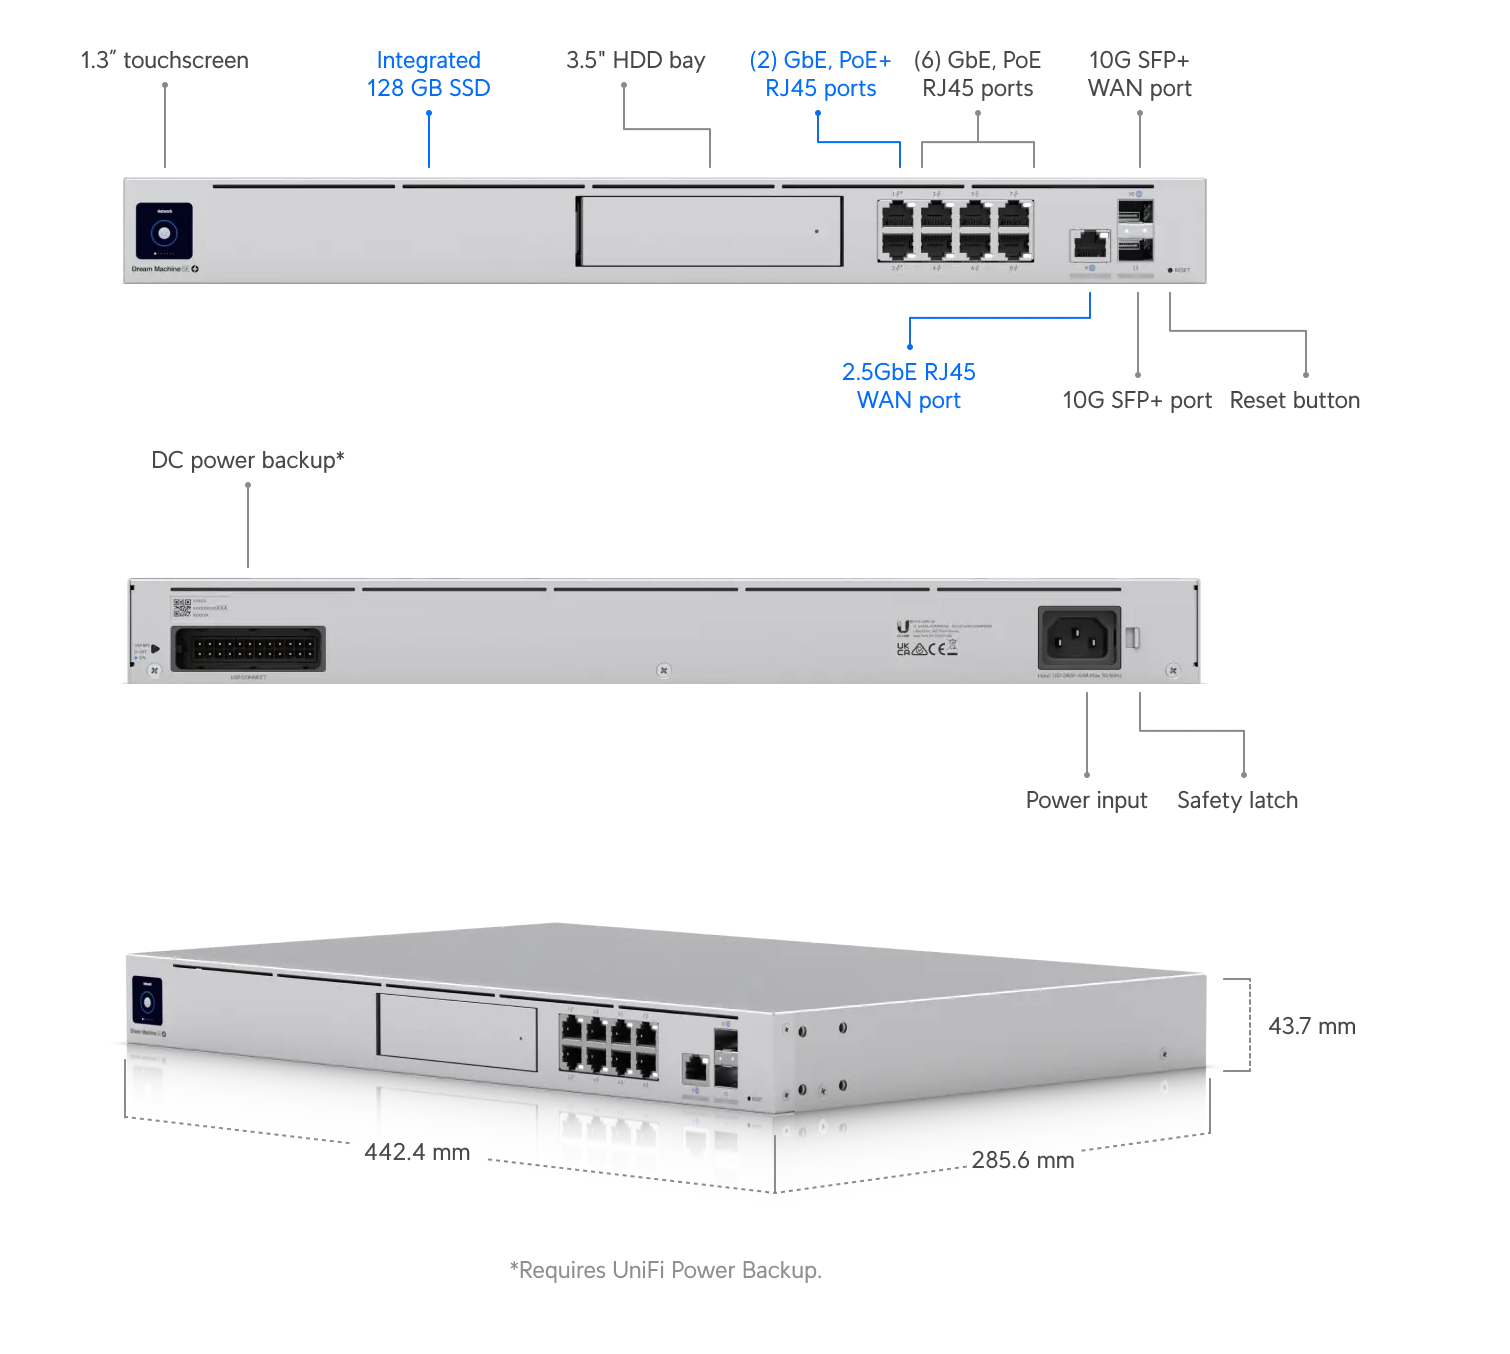
UDM-SE1

  • Those who want it all
  • Like rack mounts
  • Have large-scale deployment needs
  • Need 10Gbps WAN
  • Require SFP+ ports
  • Or simply don’t want any regrets.

Limitations

  • Little to none. The SE comes with 8 PoE ports, suitable for deploying 7-8 UniFi APs/Cameras. If expecting more than eight PoE devices, get the UDM Max and additionally buy a 24/48 port PoE switch.
    UDM-SE2

Why Not UDM-Pro?

At this level, if you need to deploy 7-8 PoE devices, the price difference for the UDM-Pro-SE will be cheaper than buying an additional PoE switch. For large PoE device deployments, the UDM-Pro-Max’s performance can handle multiple cameras happily. The basic UDM-Pro just feels stuck in between.

AP Options for Cloud Gateway/UDM-Pro

Choose either the U6+ (£94) or the U7 Pro (£171). The ones in between can be skipped:

Why Not:

  • U7 Pro Max (£267): Mainly adds scanning features; not worth the price unless you have clear requirements.
  • U7 Pro Wall (£190): U7 Pro can also be wall-mounted, but it looks odd mounted on the ceiling. If you’re like K11 and want the AP embedded in the wall out of sight, it’s a choice.
  • U7 Outdoor (£190): Choose as needed.
  • U6 Enterprise (£267) / Pro (£152) / LR (£171): Look at the price; just get the U7 Pro. For Home Network, 300 connected devices of the U7 Pro are enough.

Camera Options for Cloud Gateway/UDM-Pro

Unless you have clear requirements, the G5 Turret Ultra (£94) is a no-brainer. It’s clear enough, waterproof for indoor/outdoor use, and has all you need.

Special Needs:

  • License Plate Recognition: UniFi AI Pro (£478), generally installed at the front door.
  • For other specific needs or designs, refer to ui.com.

This isn’t a commercial post; All equirements are purchased on my own cost. (Although I’d love to have UniFi sponsor me) it’s just a UniFi fan sharing my UniFi setup recommendations. I’ve almost tried them all. UniFi’s Site Manager for remote management is super convenient, providing easy remote support for my parent’s home.
myUniFi

UniFi

移民人士:

UniFi可以網絡層級連接香港的VPN(eg. Surfshark, Nord, Wireguard),令你可以直接條件式自動「返香港」(eg. 睇Viu) 而應用程式係分唔到你係唔係VPN緊(因為你手機真係無開到「VPN」)

UX1

入門級:UniFi Express (£123) (不推薦UDR)

推薦人群:

想要穩定的無線網路環境,並想開始接觸企業級/Prosumer 等級的網絡設置 (vLan, VPN, Static Route, Multiple SSID, 條件網絡設定,等)

限制:

1Gbps 網絡,沒有IPS/IDS,只有一孔LAN口但可以接駁switch增加LAN port,最大支援5台UniFi Network設備統一管理(實際上接unmanaged switch則沒有上限)
UX2

為什麼不推薦UDR:

由於先天限制,UDR的WAN最多只能跑700Mbps,而且CPU效能比較不行,如果安裝了UniFi Protect會更慢,因此如果只需要網絡跑UniFi Express就好

UCG-Max1

ProSumer 級:UniFi Cloud Gateway Max (£190) (不推薦Cloud Gateway Ultra)

推薦人群:

需要IPS/IDS,需要2.5Gbps WAN/LAN,需要雙WAN備援,或需要UniFi Protect (Survellience Camera) / UniFi Access / UniFi Talk 等

限制:

除了沒有10Gbps WAN孔外基本上沒有太大限制,是新的家用全家桶之選了
UCG-Max1

為什麼不推薦Cloud Gateway Ultra:

雖然有2.5Gbps WAN,但由於先天限制,LAN和背版頻寬只有1Gbps,又不能跑UniFi Protect,又沒有內建WiFi,有點卡在中間的感覺,倒不如買Express,或者有Protect需求就買Cloud Gateway Max。當然如果你非常清楚你的需求是什麼(例如跑5+ AP)也是可以買的

UDM-SE1

我全都要級:UniFi Dream Machine SE (一般 £478) / UniFi Dream Machine Max (不缺錢錢 £574) (基本版UDM-Pro就不推薦了)

推薦人群:

我全都要,喜歡機架,有大規模布建需求,10Gbps WAN,需要SFP+ port,或純粹不想有任何遺憾的人

限制:

沒什麼限制的,SE自帶8口PoE,適合預期7-8台UniFi 的AP/Camera,如果預期會使用多於8台PoE設備,則買UDM Max再另購24/48口 PoE Switch
UDM-SE2

為什麼不推薦UDM-Pro:

買到這個等級了,需要布建7-8台PoE設備的話買UDM-Pro-SE的價差會比多買一台PoE Switch 便宜,布建大量 PoE設備的話,UDM-Pro-Max的效能才可以比較開心的處理多台Camera。基本版的UDM-Pro就卡在中間不上不下的。

關於Cloud Gateway / UDM-Pro的AP選擇:要不買U6+ (£94),要不買U7 Pro (£171),中間的都可以skip掉

為什麼不買:

  • U7 Pro Max (£267):主要是多了scanning功能,不值這個價錢,除非你需求清楚
  • U7 Pro Wall (£190):U7 Pro其實也可以掛牆,但U7 Pro Wall掛頂就怪怪的,除非你是K11要將AP放進牆體中看不見
  • U7 Outdoor (£190):按需選擇
  • U6 Enterprise (£267) / Pro (£152) / LR (£171):看看價錢,直接買U7 Pro 吧(我們是Home Network,不會有100+ devices的,U7 Pro 的 300 connected devices 夠用了)

關於Cloud Gateway / UDM-Pro的Camera選擇:基本上除非有清楚需求,否則無腦G5 Turret Ultra (£94) 就可以了,足夠清晰,戶內戶外防水,你要的都大概有了

特殊需求:

  • 需要車牌識別警示(一般只會在前門裝一台):UniFi AI Pro (£478)
  • 其他特殊需求/指定外觀請自行到ui.com查看

這不是工商文,只是作為一個UniFi粉分享我自己的UniFi使用建議,我幾乎都玩齊了,UniFi 的Site Manager能做遠端管理真的是超方便,父母家遠距輕鬆支援
myUniFi

In managing an ESXi server, ensuring all disks are healthy and functional is crucial to maintaining overall system reliability and performance. A failed disk can lead to data loss or even system downtime. Thus, proactively monitoring disk health using SMART (Self-Monitoring, Analysis, and Reporting Technology) data is a smart practice. This blog post walks you through a shell script designed to check the health of all disks on your ESXi server.

Introduction to the Script

The script leverages esxcli commands to fetch SMART data for each disk and formats the output in a readable table, logging it along with a timestamp. Key information such as health status, drive temperature, power-on hours, power cycle count, and reallocated sector count is extracted and displayed, helping you quickly identify potential issues.

You will able to check the SMART information as below sample:
> ./smart.sh

1
2
3
4
5
6
7
Drive                                   | Health Status | Drive Temperature | Power-on Hours | Power Cycle Count | Reallocated Sector Count
---------------------------------------------------------------------------------------------------------------------------------------------
eui.0000000001000000b7d6c88d0a080f00 OK 40/77 3118 81 0/90
t10.NVMe.WD.PC.SN740.SDDPTQE2D2T00.02F2E OK 42/84 549 1473 0/90
t10.NVMe.EDILOCA.EN870.4TB.4334424002000 OK 44/90 20 3 0/99
t10.NVMe.SAMSUNG.MZVL22T0HBLB2D00B00.5D8 OK 44/81 11498 346 0/90
t10.NVMe.EDILOCA.EN870.4TB.5435424002000 OK 44/90 19 4 0/99

Prerequisites

  • A working ESXi server
  • SSH access enabled on the ESXi server
  • Basic familiarity with shell scripts

The Script

You can download here: GitHub Download
or you can copy the following script to your ESXi.
Here is the complete shell script for checking disk health using SMART data on ESXi, Place it in your ESXi, and chmod +x smart.sh so you can execute the script.

smart.sh:

1
2
3
4
5
6
7
8
9
10
11
12
13
14
15
16
17
18
19
20
21
22
23
24
25
26
27
28
29
30
31
32
33
34
35
36
37
38
39
40
41
42
43
44
45
46
47
48
49
50
51
52
53
54
55
56
57
58
59
60
61
62
63
64
65
66
67
68
69
70
71
72
73
74
75
76
77
78
79
80
81
82
#!/bin/sh
#ESXi SMART Script by @Upinel https://upinel.github.io. All Rights Reserved.

# Get the list of all device UIDs
device_list=$(esxcli storage core device list | grep -E '^t10.|^eui.' | awk '{print $1}')

# Timestamp for log
timestamp=$(date '+%Y-%m-%d %H:%M:%S')

# Header for the output
header="Drive | Health Status | Drive Temperature | Power-on Hours | Power Cycle Count | Reallocated Sector Count"
separator="---------------------------------------------------------------------------------------------------------------------------------------------"
echo "$header"
echo "$separator"
# Begin logging output with timestamp
{
echo "Timestamp: $timestamp"
echo "$header"
echo "$separator"
} >> smart.log

# Function to process device name
process_device_name() {
local device_name=$1
# Replace multiple underscores with a single period
device_name=$(echo "$device_name" | sed 's/_\+/\./g')
# Truncate to a maximum of 40 characters
device_name=$(echo "$device_name" | cut -c 1-40)
echo "$device_name"
}

# Iterate through each device UID and fetch its SMART data
for device in $device_list
do
# Process the device name
processed_device_name=$(process_device_name "$device")

# Get the SMART data
output=$(esxcli storage core device smart get -d $device)

# Format the output
formatted_output=$(echo "$output" | awk -v device="$processed_device_name" '
BEGIN {
# Initialize default values
status["Health Status"] = "N/A"
status["Power-on Hours"] = "N/A"
status["Drive Temperature"] = "N/A/N/A"
status["Power Cycle Count"] = "N/A"
status["Reallocated Sector Count"] = "N/A/N/A"
}
# Capture specific parameters and thresholds
/Health Status/ {status["Health Status"] = $3 ? $3 : "N/A"}
/Power-on Hours/ {status["Power-on Hours"] = $3 ? $3 : "N/A"}
/Drive Temperature/ {
value = $3 ? $3 : "-"
threshold = $4 ? $4 : "-"
status["Drive Temperature"] = value "/" threshold
}
/Power Cycle Count/ {status["Power Cycle Count"] = $4 ? $4 : "N/A"}
/Reallocated Sector Count/ {
value = $4 ? $4 : "0"
threshold = $5 ? $5 : "-"
status["Reallocated Sector Count"] = value "/" threshold
}
END {
# Print the results with formatted and truncated drive name (40 characters max)
printf "%-41s %-15s %-19s %-16s %-19s %-36s\n",
device,
status["Health Status"],
status["Drive Temperature"],
status["Power-on Hours"],
status["Power Cycle Count"],
status["Reallocated Sector Count"]
}')

# Append formatted output to the log file
echo "$formatted_output" >> smart.log
echo "$formatted_output"
done

# Print an empty line for readability in the log
echo "" >> smart.log

Conclusion

Regularly checking your disk health can help prevent unexpected failures and prolong the lifespan of your hardware. The script presented here aims to facilitate this process, making it easier to monitor and log the SMART health status of all drives on your ESXi server.

Video editing can be a time-consuming process, especially when you need to trim out long pauses or silences manually. However, there’s a powerful tool called Auto-Editor that can automate the process for you. In this blog post, we’ll walk you through the steps to use Auto-Editor to automatically remove silences in your video clips, making your editing workflow faster and more efficient.

What is Auto-Editor?

Auto-Editor is an open-source software that automatically edits video and audio by analyzing the content to detect and remove silences, stutters, and long pauses. It significantly speeds up the editing process, especially for vloggers, podcasters, and streamers who frequently need to clean up raw footage.

Key Features of Auto-Editor

  • Automatically removes silences
  • Supports various export formats, including Final Cut Pro, Premiere Pro, and standard video files
  • Offers a range of customization options, such as margins and custom thresholds for silence detection

Installing Auto-Editor

Before we get started, you need to have Auto-Editor installed on your system. Follow these steps to install it:

Step 1: Install Python

Auto-Editor is a Python package, so ensure you have Python installed on your machine. You can download and install Python from the official website.

Step 2: Install Auto-Editor

You can install Auto-Editor via pip, the package installer for Python. Open your terminal or command prompt and run the following command:

1
pip install auto-editor

Removing Silences with Auto-Editor

Now that we have Auto-Editor installed, let’s dive into an example to remove silences from a video clip.

Sample Command: Basic Usage

Here’s a basic command to remove silences from a video named example.mp4:

1
auto-editor example.mp4 --margin 0.2sec --export final-cut-pro

Breaking Down the Command

  • example.mp4: The input video file.
  • –margin 0.2sec: Adds a 0.2-second margin before and after detected audio. This helps in maintaining a smooth transition between audio segments.
  • –export final-cut-pro: Specifies the export format. Here, it’s set to Final Cut Pro, but you can choose from other available formats such as premiere, resolve, or standard video formats like mp4.

Step-by-Step Guide

  1. Open Your Terminal/Command Prompt: Ensure you are in the directory containing your video file (example.mp4).
  2. Run the Command: Type the sample command and hit Enter. Auto-Editor will process the video, detect the silences, and remove them based on the margin you specified.
  3. Check the Output: The edited video will be saved in the specified format (in this case, example.fcpxml for Final Cut Pro).

Customizing Auto-Editor

Auto-Editor provides several other useful options for more tailored editing. Here are a few:

  • –silent-threshold: Sets the decibel level for what should be considered silence. For example: --silent-threshold -40dB.
  • –video-speed: Speed up non-silent parts of the video. For example: --video-speed 1.25.
  • –frame-margin: Adds extra frames before and after detected audio. For example: --frame-margin 5.

Example: Advanced Usage

Let’s say you have a video clip (interview.mp4) that you want to edit. You want to remove silences, add a 5-frame margin, consider anything quieter than -45dB as silence, and speed up non-silent parts to 1.5x the normal speed.

Your command will look like this:

1
auto-editor interview.mp4 --silent-threshold -45dB --margin 0.3sec --video-speed 1.5 --frame-margin 5 --export premiere

Explanation

  • –silent-threshold -45dB: More stringent threshold for detecting silence.
  • –margin 0.3sec: Slightly larger audio margin to ensure smooth transitions.
  • –video-speed 1.5: Speed up the retained content to 1.5x.
  • –frame-margin 5: Adds 5 extra frames before and after audio segments.
  • –export premiere: Exports the result in a format compatible with Adobe Premiere Pro.

Conclusion

Auto-Editor offers a quick and efficient way to clean up your video and audio files by automatically removing silences and unwanted pauses. Whether you’re a content creator looking to streamline your editing process or a professional editor aiming to save time, Auto-Editor can be a valuable addition to your toolkit.

Feel free to experiment with different settings and find what works best for your needs. If you have any questions or insights, drop them in the comments below!

Basic Commands for KMS Activation

If you’re looking to activate your Windows system using KMS (Key Management Service), you’ll need to use a few essential commands. Below are the basic commands to get you started:

1
2
3
4
slmgr /skms YOUR-KMS-SERVER
slmgr /ipk KMS-KEY
slmgr /ato
slmgr /dlv

Command Breakdown:

  1. slmgr /skms YOUR-KMS-SERVER: Sets the address of the KMS server.
  2. slmgr /ipk KMS-KEY: Installs the KMS client key.
  3. slmgr /ato: Activates Windows with the specified KMS server.
  4. slmgr /dlv: Displays detailed license information.

KMS Key Collection

Below is a collection of KMS client product keys for various Windows operating system editions. These keys can be used with the commands above to facilitate activation.

Operating system edition KMS Client Product Key
Windows Server 2022 Standard VDYBN-27WPP-V4HQT-9VMD4-VMK7H
Windows Server 2022 Datacenter WX4NM-KYWYW-QJJR4-XV3QB-6VM33
Windows Server 2022 Datacenter: Azure Edition NTBV8-9K7Q8-V27C6-M2BTV-KHMXV
Windows Server 2019 Standard N69G4-B89J2-4G8F4-WWYCC-J464C
Windows Server 2019 Datacenter WMDGN-G9PQG-XVVXX-R3X43-63DFG
Windows Server 2019 Essentials WVDHN-86M7X-466P6-VHXV7-YY726
Windows Server 2016 Standard WC2BQ-8NRM3-FDDYY-2BFGV-KHKQY
Windows Server 2016 Datacenter CB7KF-BWN84-R7R2Y-793K2-8XDDG
Windows Server 2016 Essentials JCKRF-N37P4-C2D82-9YXRT-4M63B
Windows Server Standard N2KJX-J94YW-TQVFB-DG9YT-724CC
Windows Server Datacenter 6NMRW-2C8FM-D24W7-TQWMY-CWH2D
Windows 11 Pro W269N-WFGWX-YVC9B-4J6C9-T83GX
Windows 10 Pro W269N-WFGWX-YVC9B-4J6C9-T83GX
Windows 11 Pro N MH37W-N47XK-V7XM9-C7227-GCQG9
Windows 10 Pro N MH37W-N47XK-V7XM9-C7227-GCQG9
Windows 11 Pro for Workstations NRG8B-VKK3Q-CXVCJ-9G2XF-6Q84J
Windows 10 Pro for Workstations NRG8B-VKK3Q-CXVCJ-9G2XF-6Q84J
Windows 11 Pro for Workstations N 9FNHH-K3HBT-3W4TD-6383H-6XYWF
Windows 10 Pro for Workstations N 9FNHH-K3HBT-3W4TD-6383H-6XYWF
Windows 11 Pro Education 6TP4R-GNPTD-KYYHQ-7B7DP-J447Y
Windows 10 Pro Education 6TP4R-GNPTD-KYYHQ-7B7DP-J447Y
Windows 11 Pro Education N YVWGF-BXNMC-HTQYQ-CPQ99-66QFC
Windows 10 Pro Education N YVWGF-BXNMC-HTQYQ-CPQ99-66QFC
Windows 11 Education NW6C2-QMPVW-D7KKK-3GKT6-VCFB2
Windows 10 Education NW6C2-QMPVW-D7KKK-3GKT6-VCFB2
Windows 11 Education N 2WH4N-8QGBV-H22JP-CT43Q-MDWWJ
Windows 10 Education N 2WH4N-8QGBV-H22JP-CT43Q-MDWWJ
Windows 11 Enterprise NPPR9-FWDCX-D2C8J-H872K-2YT43
Windows 10 Enterprise NPPR9-FWDCX-D2C8J-H872K-2YT43
Windows 11 Enterprise N DPH2V-TTNVB-4X9Q3-TJR4H-KHJW4
Windows 10 Enterprise N DPH2V-TTNVB-4X9Q3-TJR4H-KHJW4
Windows 11 Enterprise G YYVX9-NTFWV-6MDM3-9PT4T-4M68B
Windows 10 Enterprise G YYVX9-NTFWV-6MDM3-9PT4T-4M68B
Windows 11 Enterprise G N 44RPN-FTY23-9VTTB-MP9BX-T84FV
Windows 10 Enterprise G N 44RPN-FTY23-9VTTB-MP9BX-T84FV
Windows 10 Enterprise LTSC 2021 M7XTQ-FN8P6-TTKYV-9D4CC-J462D
Windows 10 Enterprise LTSC 2019 M7XTQ-FN8P6-TTKYV-9D4CC-J462D
Windows 10 Enterprise N LTSC 2021 92NFX-8DJQP-P6BBQ-THF9C-7CG2H
Windows 10 Enterprise N LTSC 2019 92NFX-8DJQP-P6BBQ-THF9C-7CG2H
Windows 10 Enterprise LTSB 2016 DCPHK-NFMTC-H88MJ-PFHPY-QJ4BJ
Windows 10 Enterprise N LTSB 2016 QFFDN-GRT3P-VKWWX-X7T3R-8B639
Windows 10 Enterprise LTSB 2015 WNMTR-4C88C-JK8YV-HQ7T2-76DF9
Windows 10 Enterprise LTSB N 2015 2F77B-TNFGY-69QQF-B8YKP-D69TJ
Windows IoT Enterprise LTSC 2021 KBN8V-HFGQ4-MGXVD-347P6-PDQGT

Source: Microsoft KMS Client Activation Keys

These keys are specifically tailored for use with KMS servers and should not be used for other types of activations. Make sure to replace YOUR-KMS-SERVER and KMS-KEY in the commands with the appropriate server address and key from the list above.

Happy Activating!

Automating the deployment process for your Node.js web application can save you a significant amount of time and effort. By integrating PM2 with GitHub Actions, you can set up a continuous deployment pipeline that ensures your application is always up-to-date. This guide will walk you through the steps to set up your environment and create a seamless deployment workflow.

Step 1: Install Environment

1. Install Node.js and npm

Ensure you have Node.js and npm installed on your server. You can do this by downloading the installer from the official Node.js website or using a package manager.

2. Install Essential Tools

Install additional necessary tools like screen and vim. These tools are useful for managing terminal sessions and editing files, respectively.

3. Install PM2

PM2 is a process manager for Node.js applications. You can install it globally using npm:

1
sudo npm install -g pm2

4. Allow Non-Root User to Use Port 80 (optional)

To let a non-root user bind to port 80, you can use libcap2-bin. This step is optional but recommended for running your application on standard HTTP port:

1
2
apt install libcap2-bin -y
sudo setcap 'cap_net_bind_service=+ep' $(which node)

5. Create GitHub Self-Hosted Runner

Set up a self-hosted runner on GitHub by following the instructions in your repository settings under “Actions”. This runner will be responsible for executing your deployment pipeline.
follow repo-setting-action-self-host

6. Create GitHub Action Workflow: deploy.yml

Create a GitHub Actions workflow file in your repository under .github/workflows/deploy.yml:

1
2
3
4
5
6
7
8
9
10
11
12
13
14
15
16
17
18
19
20
21
name: Node.js CI

on:
push:
branches: [ "main" ]
pull_request:
branches: [ "main" ]

jobs:
build:

runs-on: [self-hosted, Production]

steps:
- uses: actions/checkout@v4
- name: Use Node.js 20.x
uses: actions/setup-node@v2
with:
node-version: 20.x
- run: npm install
- run: pm2 restart YOUR-WEBAPP-NAME

7. setup pm2 services

Start your Node.js application with PM2. For example, if your entry file is server.js:

1
pm2 start server.js --name YOUR-WEBAPP-NAME --time

Verify and Monitor Your Application

Check PM2 Status

Verify that your application is running properly with:

1
pm2 status

Check PM2 Logs

View your application’s logs:

1
pm2 logs

Real-Time Monitoring

Monitor your application’s performance and logs in real-time:

1
pm2 monit

Other Useful PM2 Commands

Manage your PM2 processes with these additional commands:

1
2
3
4
5
6
7
8
9
10
11
12
13
14
15
16
17
# Delete a process by its id
pm2 del <id>

# Delete all processes
pm2 del all

# Start a specific process by name
pm2 start <name>

# Stop a specific process by name
pm2 stop <name>

# Configure PM2 to start on system startup
pm2 startup

# Save the process list to be loaded on startup
pm2 save

For more detailed information on PM2 features and usage, visit the PM2 Documentation.

When managing servers or desktops, knowing the details of your PCIe configuration can be very beneficial. This information is essential for troubleshooting hardware issues, upgrading components, or optimizing performance. One of the most powerful tools for examining PCIe details on Debian-based systems is lspci.

In this blog post, we’ll show you a quick command to check the PCIe lane configuration using lspci.

Using lspci to Check PCIe Lanes

The lspci command is a standard utility to list all PCI devices on your system. However, to get detailed information about PCIe lanes, you’ll need to use it with certain options and grep for specific fields.

Here’s the command you need:

1
lspci -vv | grep -P "[0-9a-f]{2}:[0-9a-f]{2}\.[0-9a-f]|LnkSta:"

Breaking Down the Command

  • lspci -vv: The -vv option tells lspci to be very verbose, providing detailed information about each PCI device.

  • grep -P "[0-9a-f]{2}:[0-9a-f]{2}\.[0-9a-f]|LnkSta:": This grep command uses a Perl-compatible regular expression. It searches for:

    • [0-9a-f]{2}:[0-9a-f]{2}\.[0-9a-f]: This part matches the PCI address.
    • LnkSta:: This part searches for the link status, which includes the current PCIe lane configuration.

Example Output

Running this command, you might see output similar to the following:

1
2
3
4
00:1c.0 PCI bridge: Intel Corporation 82801 Mobile PCI Bridge (rev f2)
LnkSta: Speed 2.5GT/s, Width x1
01:00.0 VGA compatible controller: NVIDIA Corporation GP107GL [Quadro P400] (rev a1)
LnkSta: Speed 8GT/s, Width x16

In the example above:

  • The PCI bridge at address 00:1c.0 operates at 2.5GT/s (Giga-transfers per second) and uses 1 lane.
  • The NVIDIA Quadro P400 at address 01:00.0 operates at 8GT/s and uses 16 lanes.

Why Is This Information Important?

Understanding the PCIe lane configuration is crucial for several reasons:

  1. Performance Optimization: Ensuring that high-performance devices, like GPUs, are connected via the correct number of PCIe lanes can significantly impact performance.

  2. Troubleshooting: Sometimes, hardware issues might be related to improper PCIe configurations or limitations.

  3. Upgrading Hardware: Knowing your system’s current PCIe configuration can help determine compatibility with new components.

Conclusion

Checking your PCIe lane configuration is a straightforward process with the lspci command. This information can be pivotal for optimizing performance, troubleshooting, and general hardware management.

If you have any further questions or if there’s a specific task you need help with, feel free to ask in the comments below. Happy computing, and may your system always run smoothly!

Are you looking to install Windows 11 on an older PC that doesn’t meet the official hardware requirements? Don’t worry; there’s a way to bypass the TPM, RAM, and Secure Boot checks during the installation process. Follow the steps below to get Windows 11 up and running on your system.

Step-by-Step Guide to Bypass Hardware Requirements

1. Boot Off Your Windows 11 Install Disk

If you don’t already have a Windows 11 installation disk, you can create one by following our guide on how to download Windows 11. Once you have the install disk ready, boot from it. You should see a screen that asks you to choose the language of your install.

2. Launch Command Prompt

Once you’re at the language selection screen, press SHIFT + F10 to open the Command Prompt.

3. Launch Registry Editor

Type regedit into the Command Prompt and hit Enter to launch the Registry Editor.

4. Navigate to Setup Key

In the Registry Editor, navigate to HKEY_LOCAL_MACHINE\SYSTEM\Setup.

5. Create a New Registry Key Named LabConfig

Right-click in the right window pane, select New -> Key, and name the new key LabConfig.

6. Create DWORDs to Bypass TPM, Secure Boot and RAM Checks

Within the LabConfig key, create the following DWORD 32 values and set each to 1:

  • BypassTPMCheck
  • BypassSecureBootCheck
  • BypassRAMCheck (if you also want to bypass the RAM requirement)

To create a new DWORD value, right-click in the right window pane, select New -> DWORD (32-bit) Value, name the key, then double-click the entry to set it to 1.

For a more straightforward solution, you can use the following reg.exe commands to automate this process via the Command Prompt:

1
2
3
reg.exe add HKEY_LOCAL_MACHINE\SYSTEM\Setup\LabConfig /v BypassTPMCheck /t REG_DWORD /d 1 /f
reg.exe add HKEY_LOCAL_MACHINE\SYSTEM\Setup\LabConfig /v BypassSecureBootCheck /t REG_DWORD /d 1 /f
reg.exe add HKEY_LOCAL_MACHINE\SYSTEM\Setup\LabConfig /v BypassRAMCheck /t REG_DWORD /d 1 /f

Simply copy and paste these commands into the Command Prompt and hit Enter.

7. Close Registry Editor and Command Prompt

Close the Registry Editor and the Command Prompt. You should then be able to proceed with the Windows 11 installation process without encountering any of the hardware requirement checks.

By following these steps, you can bypass the TPM, RAM, and Secure Boot checks and install Windows 11 on your older PC effortlessly.

Happy installing!

Have you installed a desktop environment on Debian that you no longer need? Whether you’re looking to free up space or want to use a minimal install without a GUI, this guide will walk you through the steps to uninstall the desktop environment on Debian.

Step-by-Step Guide to Uninstall Desktop Environment

Firstly, you can identify the packages related to the desktop environment using the following command:

1
2
# check package related to desktop
tasksel --task-packages desktop

2. Uninstall the Desktop Environment Packages

You can then use apt-get purge to remove all the packages related to the desktop environment. This can be done efficiently by combining the output from the previous command:

1
apt-get purge $(tasksel --task-packages desktop)

Alternatively, you might consider a more comprehensive removal using the following command:

1
apt purge task-desktop hyphen-en-us libglu1-mesa libreoffice-* libu2f-udev mythes-en-us x11-apps x11-session-utils xinit xorg xserver-* desktop-base task-german task-german-desktop totem gedit gedit-common gir1.2-* gnome-* gstreamer* sound-icons speech-dispatcher totem-common xserver-* xfonts-* xwayland gir1.2* gnome-*

3. Autoremove Unnecessary Packages

After purging, you should also run apt autoremove –purge to clean up any remaining dependencies that were automatically installed with the desktop environment and are no longer needed:

1
apt autoremove --purge

By following these steps, you can successfully remove the desktop environment from your Debian system, leaving you with a leaner and more minimal setup.

A local CD can act as an APT repository, just as if it were a distant server. This feature is incredibly useful when you are installing Debian on systems without a fast internet connection or when you need to install packages from localized media. However, once the installation is done or if you prefer using online repositories, you might want to disable the CD-ROM source to avoid any unnecessary prompts.

If you don’t want apt-get to search the CD, you can achieve this easily by editing the /etc/apt/sources.list file. Here’s how to do it:

Steps to Remove CD-ROM apt Source

  1. Open the /etc/apt/sources.list file:
    To edit the file, you need administrative privileges. You can use nano or any other text editor you prefer. If you’re using nano, the command would look like this:
1
sudo nano /etc/apt/sources.list
  1. Find the CD-ROM source line:
    Look for the line that specifies the CD-ROM as a source. It will look something like this:
1
deb cdrom:[deb95amd64d1]/ stretch contrib main
  1. Comment out the CD-ROM source line:
    To disable this source, simply comment out the line by adding a # at the beginning of it. The result should look like this:
1
# deb cdrom:[deb95amd64d1]/ stretch contrib main
  1. Save and close the file:
    In nano, you can do this by pressing CTRL+X, then Y to confirm the changes, and Enter to exit.

  2. Update your package list:
    After making these changes, ensure your package list is up to date by running:

1
sudo apt-get update

By following these steps, you instruct apt-get to ignore the CD-ROM as a source, relying instead on your other sources for package installations and updates.

Whether you’re managing package sources or ensuring your applications are running smoothly, Debian and its tools offer robust solutions for both tasks.

Taking care of your system’s configurations thoughtfully can save a lot of time and hassle.

0%